

Alexander Grabovetskiy, woodcarver, School of Woodcarving · Published 2017
Do you outline first or clear the background first in relief carving?
Quick answer: Setting in a relief carving is the stage where I fix the main outline in the wood, and I can start it more than one way. I can outline first with a deeper gouge or a V tool, about 5 mm away from the drawing, or lower the ground first using a big gouge.
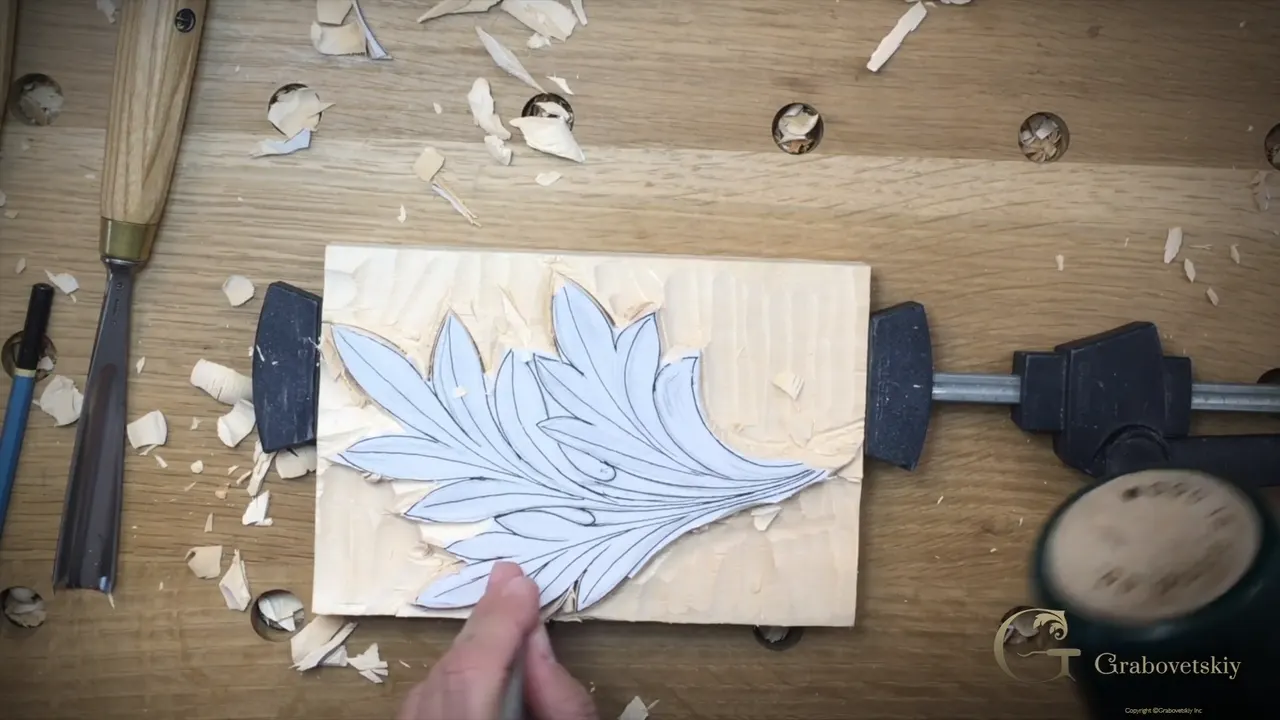
Setting in a deep relief is the stage where I set the leaf's main outline into the wood. There are three ways to start it, and I say on camera that they're all correct. A V tool can go around the drawing. A deeper gouge can make that same trip. Or a big gouge takes the background down almost to the line before any outline goes in at all. This is lesson 2 of my Corinthian acanthus course.
So you have a leaf drawn on paper and a block of wood. You'd like that leaf to stand up out of the block, deep, with real shadow around it. Where does the first gouge go? I show all three starts on one leaf here, and how close to the drawing each one stops.

Six things from this lesson
- Spray glue goes on the block and on the back of the drawing.
- The block here is about 1 1/8 inch thick (29 mm), and I go down a half inch, 13 mm.
- The ground can come off first, with a big gouge, to a sixteenth (1.5 mm) short of the line.
- For an outline, stay 1/8 to 3/16 inch (3 to 5 mm) away.
- Rotate the gouge or slice. Don't push it.
- A straight #5, 35 mm wide, fits nearly every curve on this leaf.
Do you outline first or clear the background first?
Either one works. I call it the setting stage, because we need to set that main outline of the acanthus leaf, and there's nothing wrong with any of the ways in.
The first way is a V tool. Stay away from the drawing maybe 3/16 inch, or a quarter (5 to 6 mm), and outline your carving.
Way two is the same with a deeper gouge. We're going to be excavating really deep on this leaf, so there's a lot of material to remove anyway. Keep about five millimeters off the main line. That's three sixteenths, and an eighth (3 mm) is okay too.

The third way skips the outline at the start. You remove the background almost to the line, and I leave about 1/16 inch before I hit it. I'd call this a little more extreme. Mine was a number 7, the big one, though a small one works and so does a #9 at 20 mm (about 3/4 in). I prefer the big gouge. It takes a lot more material at once.
So which did I do? Both, in order. On this leaf the ground came down first with the big #7, and that was step one. Step two was the outline, with the V tool and the #9. The true line came last. If you want to know what the words setting in mean, Roman acanthus lesson 2 spends its time on just that.


How do I glue the paper drawing to the block?
With spray glue. Any kind can work here, and I believe photo mount glue can work too, as long as you can spray it. That day I had 3M 90 handy, from 3M, and like I said, any glue will do in this case. A piece of cardboard goes under it.

Glue goes on both surfaces, the block of wood and the reverse of the drawing. I wait a couple of minutes, until I can place my finger on it and nothing sticks. That's when the paper goes on, carefully.
I tell the same story in other courses. For the flower rosette I explain that with spray glue you can't put two sides together right away. It takes a minute or so, sometimes a couple, until you can touch it and it isn't tacky.
Loctite is what I used on the chamomile and bow rosette, and I said any spray works there, photo mount glue too. Just make sure it's a fine spray and not a spitting one. And don't pick a super strong glue, because the paper has to peel off clean when you're done.


How deep does the background go on this leaf?
About a half inch. I call this somewhat deep relief carving, and my block is kind of thick, about an inch and one eighth. Going 13 mm down leaves plenty of deepness.
Your wood may be thinner. If it's three quarter inch stock, 20 mm or 19 mm, you'd leave just about a quarter inch (6 mm) at the back.
Two ways mark the depth. One is your finger, placed against the wood as a guide while you draw your line. The other is a marking gauge: put its knife part right at the line and mark your piece around. Mine was off that day for some reason.

On that rosette I say why the line matters. I mark it around, and that way I know I'm not going to go below this mark. That is how deep it's supposed to go.
Then the block gets held down, and normal clamps work fine for that. In my case I really like to use Festool clamps, and I turn the piece the way that's more comfortable for me. My bench holes are 20 mm and not three quarters of an inch, and in Hashemi flowers 15 I explain why. Other types of Festool clamps fit perfectly inside them. On the small rosette block I used Festool stop blocks in those holes and didn't lock them, so I could rotate the piece.


How far from the line should the first strokes stop?
Around a sixteenth on the ground, and an eighth to 3/16 on the outline. Stay approximately 1/16 inch from the background line, and you'll be safe. I say it twice in the video.
The grain decides a lot. I feel safe going across it on this block. Attacking from outside, going in, is also somewhat safe. And watch your grain, I say in part 2.2, and the direction you go.


Did you slip past the line? A mistake like that is not a big deal. It just means your carving ends up slightly deeper.
The outline has a reason too. Some people call this a relief cut, because you're relieving the stress of the wood, and after it, going right to the line is much easier. When a little bit broke off while I outlined with the V tool, I told you not to worry. That piece was going downhill anyway.

I meant to stay an eighth away. In one place I got closer, about a sixteenth, and I felt comfortable with that and had no problem with it.
The distance isn't one number for every carving. Working on the furniture panel, lesson 15, I stopped maybe 3/32 inch (about 2.5 mm) short with a #9 across the grain. I didn't want to destroy it. I also said don't overdo how deep you go with the tool, since that is really easy to do. Then I took a number 11 and went a little closer. It's going to be a lot easier to chop out, I said. I didn't go to the final depth there, but I wanted to get as close as possible, so the cleaning later would be a lot easier for me.
The plate with butterflies was a knife job. In butterflies lesson 10 I stayed maybe half a millimeter (about 1/50 inch) away in some spots, and kept the knife no more than one millimeter deep, about 1/25 inch. Don't press too hard there, or you can break those details. I made multiple passes in one direction, which gives much better control of the overall movement. If you think it's easy, it's actually not that easy. You really have to control the pressure of the knife.
And sometimes the line is not critical. While chopping away in the floral and molding course, lesson 2, I said I was staying away from it, approximately, and that it's not really critical in that case. Later I went right to the line. Watch my left hand in that lesson. I lay the tool on my finger with my thumb on top, and keep the whole hand placed solid on the block, and that way I have great control of the tool. Then I double-checked how high the molding was supposed to be with my pointing machine, because I had made some mistakes there before and didn't want to do it again. A Venice Room lesson takes up the same question, whether you carve on the line or next to it.

| Way to start | What I do with the tool, and where it stops | Part of the lesson |
|---|---|---|
| Outline with a V tool | I go around the drawing, roughly 3/16 to 1/4 inch away. | Shown in part 2.1 |
| Outline with a gouge | Same trip using a deeper gouge, five millimeters off, or an eighth. | Done again in 2.2 |
| Ground goes first | The big #7 takes the background to a sixteenth short of the line. | Step one, part 2.1 |
| True line last | The 35 mm #5 stands straight down to the background wherever it fits. | Most of part 2.3 |
Should you push the gouge or rotate it?
Rotate it. After the outline I took my number 9 gouge and went from the outside, cleaning the background with rotating movements, and that was against the grain. Don't push. Rotate or slice your gouge, and look how quickly that gets done.
I said it in another course too. Those sweeping or rotating movements are really important, I told you in Hashemi flowers 10, and I'm not pushing my tool there either. I'm rotating it, sometimes right to left, sometimes left to right.
Stay a little above the final line. Later on we clean it.

Which gouge goes straight down on the true line?
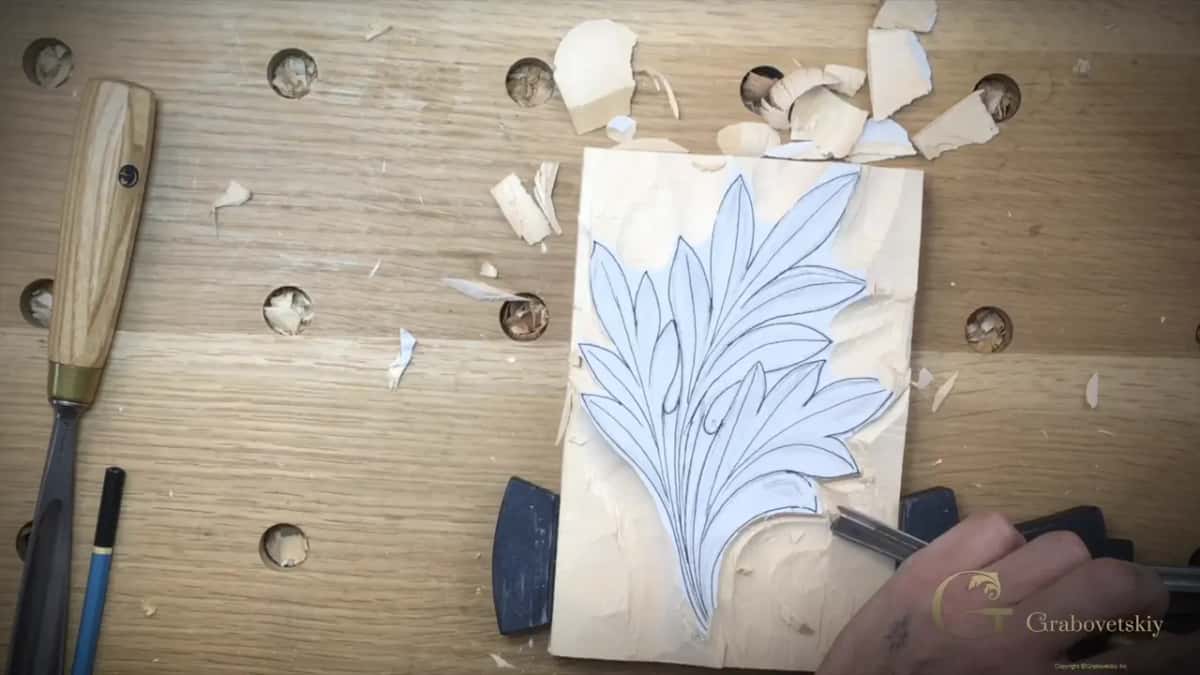
One that's really close to your outline. Mine is a number 5 at 35 millimeters (about 1 3/8 in) from Pfeil, and the caption on screen says so too. I put it straight down and take it to the background. Wherever I can fit this gouge, I'll just use it, any place really close to the line.

A gouge bigger than the spot still helps. In one area the space is much smaller than my gouge, yet I can use one of its ends. That's the privilege of a big tool. Even smaller details are no problem.
Then the same tool cleans the ground a little more, now closer to the line we just made. It fits really perfectly almost everywhere on this leaf, and almost every one of those curves is good for a number 5.


Some spots need less. I found a smaller #5 for those, and it looked absolutely perfect. Next I checked a number 7. It would fit, but I needed a smaller one, and that fit too. You could probably do the whole outline with just a number 5, I said. Just check what you have.
A carving knife does the same idea if you don't have a gouge. You follow the line, and it's also quick. I first said a cheap carving knife, then took it back, because it probably shouldn't be called cheap. I'd still prefer a gouge here, everywhere I can use one. At the end I did use the knife inside one spot, though a smaller gouge would do.


Why I keep one big gouge close
Because of speed. A big gouge like this can always remove a lot of material at once. It's always a good idea to get one. I'd say you should have at least one, because you can just do it really quickly.
Is it a must? You don't have to have just the one big gouge, although it's a real plus. Like you saw, a couple of strokes and my curve was done.
I've said much the same on other pieces. In Hashemi flowers 27 I had a number 8, about one inch (25 mm), and said a #9 would do, or any big gouge, even a number 7 at a huge three inches (76 mm). The big chunks in Venice Room lesson 79 came off with big gouges too, like a #7 three inches wide.
No big gouge? Smaller ones always work, I said in Hashemi flowers 42, like a number 7 at three quarters of an inch, 20 mm. It just takes a little longer. That's okay. Takes long anyway, as I put it.


Where this stage ends
It ends with the whole picture set in. One spot on my leaf needed to go a little deeper, so I took it deeper on both sides and cleaned it. Later on we come back with smaller tools and make that line even cleaner. For now, if you stay just slightly above your line with every stroke, you should be safe. Corinthian lesson 1 is where this acanthus gets drawn, and lesson 3 is next.

All three parts of this lesson are full videos, and you can watch them with tuition. By now you should have something that looks like my block: a Corinthian leaf standing up in its lowered ground, and chips all over the bench.

How it's done
- Glue the drawing down. I spray glue on the block and on the back of the drawing, wait until it doesn't stick to my finger, then lay the paper on carefully.
- Mark the depth around the block. About 13 mm down on my block. A finger along the side and a pencil, or a marking gauge.
- Clamp it. Normal clamps hold it. I use Festool clamps and turn the block the comfortable way.
- Take the ground down first. My big number 7 removes the waste nearly to the drawing, leaving about a sixteenth of an inch.
- Outline the leaf. A V tool or a number 9 goes around, staying an eighth to three sixteenths off. That relieves the stress in the wood.
- Stand a gouge on the true line. A straight number 5 goes straight down to the background wherever it fits. Smaller ones take the smaller areas.
Frequently asked questions
How far from the line do you stay while roughing out?
Roughly a sixteenth, 1.5 mm, when I lower the ground with my big #7. For an outline made with a V tool or a deeper gouge I keep between an eighth and 3/16 away, 3 to 5 mm. On this leaf I got a sixteenth close in one spot and felt comfortable.
What glue holds a paper pattern on wood?
Any spray glue, and photo mount spray works too. I had 3M 90 handy. I spray the block and the reverse of my drawing, then wait a couple of minutes until a finger doesn't stick, and lay the paper down carefully.
How deep do you take the ground on this Corinthian leaf?
I used a block about an inch and one eighth thick, 29 mm, and I go down about 13 mm. With three quarter inch wood, 19 or 20 mm, I would leave just about a quarter inch at the back. A finger along the side or a marking gauge marks the depth.
What to carve next