Skip to content
School of Woodcarving
Start HereCoursesLessons MapIn PersonLiveContact
School of Woodcarving
Start HereCoursesLessons MapIn PersonLiveContact

Course Content

Carving Furniture Panel – Design – Part 1
Not startedDesigning Furniture Panel 1
Not startedCarving Furniture Panel 1.1Not startedCarving Furniture Panel 1.2Not startedCarving Furniture Panel 1.3Not startedCarving Furniture Panel 1.4
Not startedDesigning Furniture Panel 2
Not startedDesigning Furniture Panel 3
Not startedDesigning Furniture Panel 4
Not startedDesigning Furniture Panel 5
Not startedDesigning Furniture Panel 6
Not startedDesigning Furniture Panel 7
Not startedDesigning Furniture Panel 8
Not startedDesigning Furniture Panel 9
Not startedDesigning Furniture Panel 10
Not startedDesigning Furniture Panel 11
Not startedDesigning Furniture Panel 12
Not startedDesigning Furniture Panel 13
Not startedDesigning Furniture Panel 14
Carving Furniture Panel – Design – Part 1

Carving Furniture Panel – Design – Part 1

New to carving? Follow the guided Start Here path →

This course includes full video lessons plus downloadable patterns and materials, available to members. Log in or come carve to see everything.

More about this course

Alexander Grabovetskiy, woodcarver, School of Woodcarving · Published 2018

How do you design a wood carving panel before you start carving?

Quick answer: Designing a carved panel starts with lines, not leaves. You glue white paper over the board, find the golden centers at six parts out of ten, set the borders by the Fibonacci sequence, and only then draw acanthus and flowers. The drawing settles almost everything the chisel will do later.

Whole walnut panel seen at once, the drawn acanthus and flowers filling it from top to bottom.
Share

This is one panel carved across three courses, and you are at the beginning of it. No gouge yet. We draw first, and when the drawing is right the wood gets carved in the two courses that follow.

Do you draw the design on paper first, or straight on the wood?

Paper first, and the paper gets glued right onto the board. I cut a sheet about an inch bigger than the panel all the way around, spray photo mount on the wood and on the paper both, press them together and trim the edge. Now I have a white surface to draw on, and white takes a pencil line and gives it back clean when I erase.

Under that paper is walnut, and not the walnut you order from a yard. I did a whole house in this stuff once. Doors almost three inches thick, baseboards, casings, every piece of furniture, all out of the same purple stock. Purple walnut. Most people have never seen any and they think I am telling stories. What I had left were two thin boards with splits in them, so I resawed and glued them like a book, and now the cathedral grain on one half answers the cathedral on the other.

Alexander holds the thin purple walnut board up to the camera.

The panel is 27 1/4 by 15 1/2 inches (692 by 394 mm) and 10 mm thick, three eighths of an inch. Thin. Nothing in the whole design will go deeper than 5 mm, three sixteenths, so this stays low relief that still has to look like a three dimensional world.

The panel does not lie flat on a bench while I work, either. I screwed the plate off my carver's vice onto the back of a sheet of MDF and dropped that into the vice, so the whole thing tilts, rises and spins around to face me. The MDF carries 20 mm holes, three quarters of an inch, and two clamps hold the work wherever I put it. You do not need my vice. You need a surface you can turn.

White paper glued smooth over the whole walnut board, ready for the first pencil line.

What pencil do you use to draw a wood carving pattern?

A soft pencil for the drawing, and charcoal only at the very end. Right now there is an 8B in my hand, about as soft as pencils come, though 2B or 4B or 6B does the same job and even a hard one will not stop you. The eraser matters more than the pencil does. I draw the same leaf five or six times before I keep one, so a line that will not lift off the paper is no use to me.

Soft 8B pencil, its point worn flat from redrawing one leaf again and again over the paper.

Charcoal comes last, and only where I want shadow. Rub a little into the background and the panel reads as three dimensions, which tells me whether a movement works before I risk a chisel on it. Charcoal is close to impossible to erase, though, so I keep it well away from any area I am still arguing with. A marker does the same job. Trace over the pencil once you have stopped arguing with the shape.

Where should the focal point go on a carved panel?

Put two focal points on the board and let one of them win. Every movie has a hero and somebody standing against the hero, and a panel gets built the same way. My strong cluster sits near the top, the quieter one near the bottom, and the eye travels between them.

Finding those two spots is geometry, not feeling. The simple road is the rule of thirds. Divide the board in three across and three down, and the four crossings hand you your candidates. Photographers and cinematographers live on that grid. I could have stopped right there and nobody would have complained. My goal was a piece of art, though, and the work that has survived followed the golden ratio instead.

Pencil lines split the board into three parts each way, marking four crossing points.

So I mark a plus for the hero and a minus for the antagonist. From that moment on, every leaf I draw has a job, which is to carry the eye between the two marks and back again.

Two circled areas on the paper, one high and one low.

Method for it

What you actually draw on the board

My verdict

The reason I give for that

Rule of thirds

Three equal parts each way, four crossings

Passed over

Photographers use it, masters did not

Six of ten

Divide any line in ten, take six

My choice

Close enough, and it looks right

True golden section

Square corner against diagonal, then ninety degrees

Built, refused

Did not like how it looked

Golden ratio tool

Four armed divider splitting ten into six

For checking

Confirms my eye, never replaces it

What is the golden ratio in wood carving design?

The golden ratio splits a line about 62 to 38, and on a panel it marks where the eye wants to rest. The number is 0.618. Fibonacci wrote it down, Leonardo da Vinci built with it, and Bach hid it inside his music, which should tell you the rule is older and bigger than woodwork.

You do not need the decimal. Divide any line into ten parts and go six. Six out of ten. My students say it back to me and still land it wrong the first few times, because six of ten feels like eyeballing and it is not.

Handwritten number 0.61834 on the paper beside the panel drawing.

A little caliper on my bench divides any distance into ten parts and shows me the six. I use it to check myself, not to draw. Most times my eye had already put the pencil close to where the tool says it belongs, and the times it did not are why I keep the tool.

Four armed divider held over the drawing beside a pen, construction lines and volutes underneath.

Where is the golden section on a board that is not proportional?

Run one diagonal corner to corner, then run a second line off the corner of the true square inside the board, and the golden point sits where they cross. My board is nowhere near a golden rectangle. Measured long against short it lands close to a root four rectangle, which is two squares end to end, so the clean arithmetic goes nowhere useful.

So I put the numbers away and draw. One diagonal each way, corner to corner. Then I find the true square inside the panel, 15 1/2 inches on a side, mark its far corner, and run a line out to the outside corner of the board. Where those two lines meet is my major center. I repeat the whole business on the inner border, 11 1/4 inches (286 mm), and that gives me the minor. Four crosses on the paper, and I have not calculated a thing.

Long ruler across the board as the diagonal goes down.

Students look at that stage and see spaghetti. Fair enough. Twenty lines on a board and not a single one will ever be carved. Every last line stays inside the finished panel anyway, the way framing inside a wall holds the house up after the drywall goes on.

How wide should the border be around a carved furniture panel?

Let the Fibonacci sequence pick the widths rather than your mood on the day. My board is 10 mm thick, so ten is my number one. Add ten to ten and you get twenty, which is 3/4 of an inch, and that is the space I leave open before any carving begins. Keep going and the sequence hands you thirty, then fifty, and 50 mm off the edge is exactly where my last border line wanted to sit.

The outer 10 mm never gets touched at all. That strip vanishes into the rails and stiles the day the panel goes into a door, but your brain still sees the edge of the design where it used to be, so the number has to be right even when nobody will look at it. Inside of that I run a 5 mm band, three sixteenths, which reads as an applied molding although nothing is applied. Every one of those figures came off the same short list. The eye feels it long before the head can name it.

Border bands drawn around the panel edge at 10, 20 and 50 millimeters.

Repetition is doing the work here, and it is a real law with a name. Rhythm in music is the same animal. A five millimetre line echoing another an inch away settles an eye, and nobody looking ever knows why the panel feels calm.

Which side of a panel does the eye start reading from?

Western eyes start at the top left and travel down to the right, while Eastern eyes start at the top right and go the other way. Sounds like nothing. Draw a line across a page, put a little car on it, and ask an American which way the car is going. He will tell you downhill, every time, because he began at the left. Flip the drawing and the same car is climbing.

Quick sketch of a car on a slope, drawn to show which way an eye walks in.

I am Russian, and Russia has an Asian half and a European half. My students live on both sides of that line, so I refused to choose. The main movement starts in the upper left and runs down across the board, then the bottom cluster gets built so the eye can also come in from the right and read backward. Confusing brains is the whole point, and nobody I know has tried it on a furniture panel.

Both diagonals carry old names. The one climbing to the upper right is the baroque diagonal, and baroque there means strange, nothing to do with the style. Its opposite is called sinister, which only means left. Once you know the two lines are on your board you will keep landing the tips of your leaves on them, and the panel will hold together for reasons no visitor can see.

Diagonal to the upper right corner, the baroque line.

Fourteen lessons of this go by before I sharpen anything. If you want to watch the drawing come up line by line and then see the same panel carved, come and carve this one with me.

How do you draw acanthus leaves and flowers so they look natural?

Repeat one movement at different sizes and never let two shapes match. Three flowers grow in my main cluster. One is the biggest. Number two comes down a size, number three smaller again, and the day all three come out equal the group is dead. Leaves behave the same. A large acanthus sits on top, a second one hides underneath it, and that overlap is the only depth you get out of 5 mm of wood.

Cluster of three, no two the same size.

There is a rule I break on camera and then fix. A leaf that runs straight into another line and stops dead makes a T, and a T stops the eye cold. The stop does not have to be visible either. If my leaf tip lands on an invisible line I drew an hour earlier, it still feels wrong, so I erase it and swing the leaf past instead.

Leaf tip drawn so it stops just short of another line instead of touching it.

Everything has to interweave. A movement that will not flow into its neighbor gets erased, and I have wiped out an hour of drawing over one leaf that refused to join the rest. Volutes carry much of that load. A tight spiral turning back on itself fills a corner and picks up a curve from somewhere else on the board, then hands the eye back to the main movement. Old carvers used a lot of volutes and so do I.

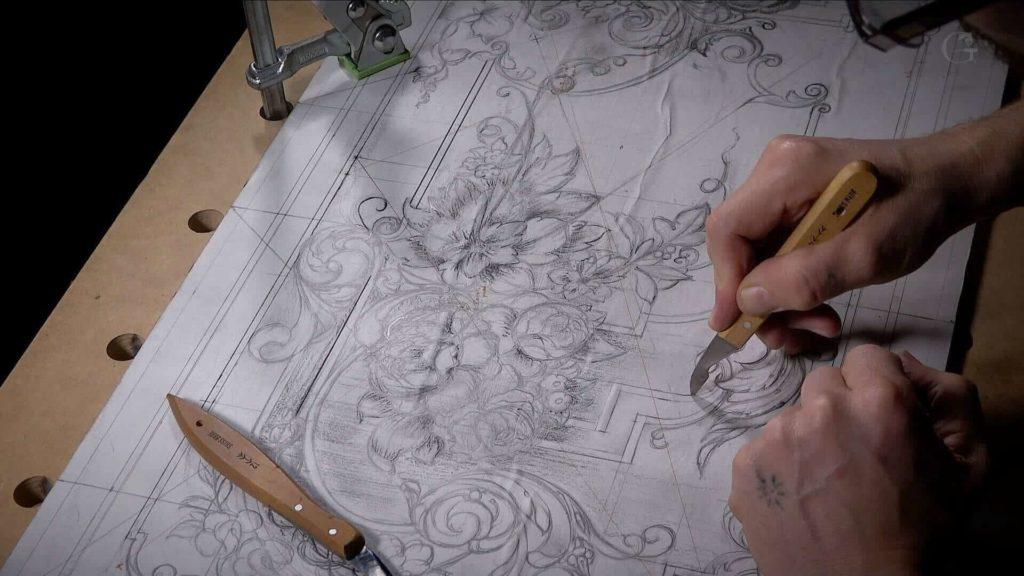
Fine marker in hand, two acanthus clusters either side.

The acanthus sits highest. Behind it lies the background, and I mark the concave hollows and the convex humps as I go so that later I know where shadow has to live. On a 5 mm panel that decision is the whole illusion.

Petals have a habit worth knowing. The outer ring of a flower grows downhill even while the rest of it climbs, so the bottom layer always falls away from you. I do not finish them at this stage. Movement goes in, a little charcoal for shadow, and the rest waits for the gouge, because in low relief a flower finds its shape under the tool.

How many flowers and leaves should be in an ornament?

Count them, and land the count on a Fibonacci number. My bottom cluster has three flowers. I drew four leaves around them, added a fifth, and five still did not fill the space, so I kept going until there were eight. One, two, three, five, eight. The same short list that gave me a 10 mm border gives me the head count.

Eight leaves drawn around the three flowers below.

Counting flowers sounds strange. I do it anyway, and when the carving starts I will count the petals the same way.

You are also going to erase more than you draw. I step back from the bench every few minutes and just stare, and half the time I go get the eraser. Around lesson nine I threw out a whole double acanthus because the area had gone crowded, kept the outline, and drew one bigger leaf with the second one hiding underneath. A roll of tape sits on my bench, and when a curve gives somebody trouble I tell them to trace around it. Between lesson eleven and lesson twelve there is a long gap, because I moved and had to set up a new shop, and this panel just sat there through all of it.

I would rather call this an apprenticeship than a school. You watch me work, take what you like, and leave the rest. Fourteen lessons later the pencil work is done and I like it, except for one element up near the top that I erased at the last minute because it just did not look right to me. Then the drawing goes out full size for the students to print and glue down. If you want this geometry in your hands instead of your notes, get Access to the whole panel course. Shall we carve?

Finished pencil drawing covering the whole walnut panel, acanthus and flowers top to bottom.

Most carvers want a gouge in their hand on day one. I did too. A panel that goes wrong at the drawing stage stays wrong forever, so I spend fourteen lessons on paper and pencil before I sharpen a thing. What follows is how I found the centers, the borders and the movement on one piece of purple walnut.

How it's done

  1. Read the board and choose its direction. Walnut with splits through it and two cathedrals that answer each other once it is resawed and book matched. I decided the panel stands upright rather than lying long, and the grain made that choice for me.
  2. Mount it so the whole thing turns. The plate off my carver's vice goes on the back of an MDF sheet drilled with 20 mm holes, and clamps hold the work at any angle I want. You need a surface that spins, not my vice.
  3. Glue white paper over the wood. Cut the sheet an inch oversize, photo mount on both faces, press it down and trim. White hands a pencil line back cleanly when the eraser comes out, and the eraser comes out constantly.
  4. Settle the top, the bottom and the entry side. Decide which way a stranger's eye walks in before one line goes down. Mine had to work from the left and from the right, because my students read in both directions.
  5. Mark the square that lives inside the rectangle. Carry the short dimension across, fifteen and a half on my panel, and pencil that square at either end. Every geometric decision afterwards hangs off those two.
  6. Name a hero and an opponent. Two focal points, one at either end, and the stronger has to win outright. Every leaf drawn afterwards exists to walk an eye between those marks and back again.
  7. Step the borders in on the sequence. Ten millimetres for the rabbet, twenty for the open band, then a five millimetre line reading as molding although nothing was applied. My stock is ten, so ten begins the count.
  8. Cross two diagonals to find the centres. One line from corner to opposite corner, a second from the inner square's angle out to the board's angle, and the meeting point is what you want. Do it again on the inner border.
  9. Draw movements first, details later, and erase hard. Spiral, then the main sweeps, then volutes, and no flower appears until lesson twelve. Around lesson nine I threw away a finished double acanthus because the area had gone crowded.
  10. Count the flowers and the leaves. Count three flowers, then add leaves until the tally lands on the sequence. Four looked wrong. Five did not fill it, eight did, and over in the opponent's corner I ran all the way to thirteen.

Frequently asked questions

What size board do you need for a carved furniture panel?

Any size works. Mine finished at 27 1/4 by 15 and a half, and the rules behave identically on something smaller. Print the full size pattern only when you need my exact proportions.

How deep is low relief carving on furniture?

Shallow. Nothing on this panel goes past 5 mm on stock a bare ten millimetres deep. Overlap and shadow do the work that digging would do on a thicker board, which is why the pencil decides so much.

How much math goes into designing an ornament?

Enough to matter, and far less than most people fear. Six parts of ten will cover most of what you actually need on a board. Real art is real geometry, and anyone telling you to draw whatever feels good is handing you a shortcut to nowhere.

Alexander Grabovetskiy

About the author

Alexander Grabovetskiy

Master Wood Carver · Founder, School of Wood Carving

Alexander Grabovetskiy is a master wood carver, named International Woodcarver of the Year. He carves classical relief the old way, from acanthus leaves to full Baroque ornament. He started the School of Wood Carving, a nonprofit, to hand these skills to anyone ready to pick up a gouge.

Follow

What to carve next

  • Part two, carving the panel
  • Part three, the last stage
  • Principles of Design in Wood Carving
  • Carving Roman Acanthus Leaf
  • Carving Floral and Molding for the Panel
  • Carving Dining Table Apron
Share

Shall we carve?

Ready to carve?

Turn reading into doing

3,000+ video lessons waiting for you — start today for $25/month.

Table of Contents

  1. Do you draw the design on paper first, or straight on the wood?
  2. What pencil do you use to draw a wood carving pattern?
  3. Where should the focal point go on a carved panel?
  4. What is the golden ratio in wood carving design?
  5. Where is the golden section on a board that is not proportional?
  6. How wide should the border be around a carved furniture panel?
  7. Which side of a panel does the eye start reading from?
  8. How do you draw acanthus leaves and flowers so they look natural?
  9. How many flowers and leaves should be in an ornament?

Why draw lines you will never carve?

Each one sets a movement that follows it. Borders, focal points, diagonals and golden centers all come off that grid, and a leaf landing on one feels right to a stranger who cannot see it.