Skip to content
School of Woodcarving
Start HereCoursesLessons MapIn PersonLiveContact
School of Woodcarving
Start HereCoursesLessons MapIn PersonLiveContact

Course Content

Chamomile and Bow Rosette
Not startedChamomile and Bow Rosette 1
Not startedChamomile and Bow Rosette 1-1Not startedChamomile and Bow Rosette 1-2Not startedChamomile and Bow Rosette 1-3
Not startedChamomile and Bow Rosette 2
Not startedChamomile and Bow Rosette 3
Not startedChamomile and Bow Rosette 4
Not startedChamomile and Bow Rosette -Final Assessment
Chamomile and Bow Rosette

Chamomile and Bow Rosette

New to carving? Follow the guided Start Here path →

This course includes full video lessons plus downloadable patterns and materials, available to members. Log in or come carve to see everything.

More about this course

Alexander Grabovetskiy, woodcarver, School of Woodcarving · Published 2021

How do you carve a rosette with a bow, leaves and berries?

Quick answer: A chamomile and bow rosette is a small carved ornament with three parts. An oval flower head ringed with beads, a ribbon bow above it, and two sprays of leaves and berries falling from the sides. Basswood 22 mm thick carries it, and almost every cut comes off the same three gouges.

Share

Some ornaments stop a panel dead, and the small ones stop it hardest. A big leaf forgives you. A rosette the size of your palm does not, because the eye lands on it and stays.

Have you ever finished a whole panel and then stalled on one detail in the middle of it? Do you own six gouges and think that rules you out of work like this? You already have enough.

This piece came out of my Venetian room. One detail out of a much bigger project, and I filmed it alone because hunting for one ornament inside a long build is miserable.

The whole panel drawing, open on an iPad.

What is a chamomile and bow rosette?

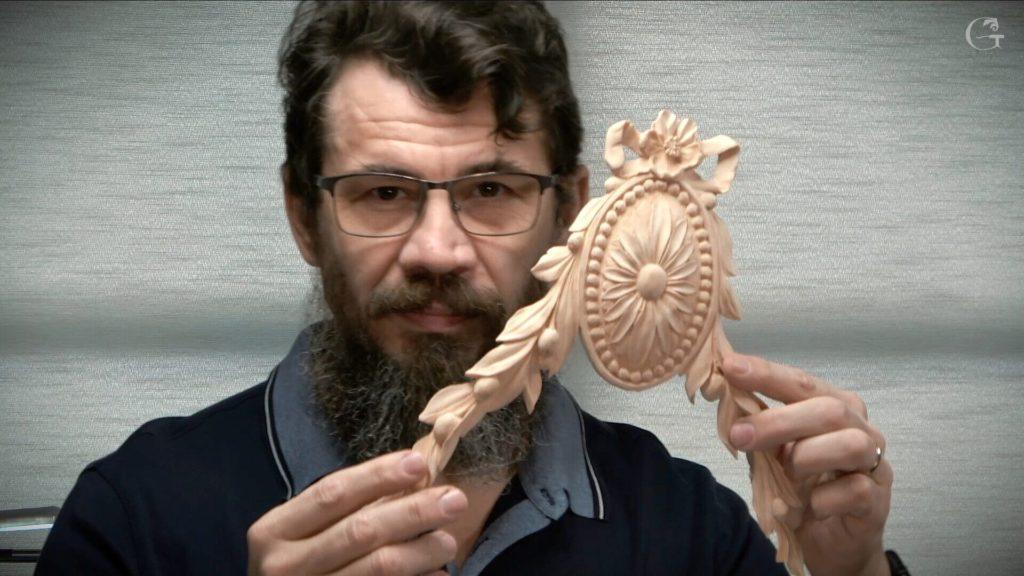
This ornament is a small carved panel piece built from three parts. An oval flower head ringed with beads, a ribbon bow sitting above it, and two sprays of foliage and berries falling away from the sides. Call it a rosette with a festoon hung off it. The whole thing sits about the size of your hand.

Key takeaways

  • Three gouges do most of this. A number 11 at half a millimetre, one and three, plus something flat for blending.
  • Glue the blank to plywood through a sheet of printer paper. It holds hard, then splits clean when you tap it off.
  • Shadow is the whole trick. Nothing here is tall, and every part of it reads deep because of what sits underneath.
  • Model the bow in clay before you cut it. Two minutes of squeezing saves an afternoon of guessing.
  • Nothing is symmetrical on purpose. The two halves differ, the edges wander, and that is what stops it looking cast.
  • Basswood at 22 mm, seven eighths of an inch, because the highest point of the rosette wants to sit right there.

Where does a piece like this actually go?

Onto a panel, under a moulding, in pairs. Mine hangs above another element with mouldings running behind some of the leaves and over the top of others, which is exactly why I raised the ends the way I did.

Two of these exist, left and right. They mirror each other, and they are not equal. I made them different on purpose at the very first cut, and if you stand back it reads as organic instead of stamped out. Same argument I make about every leaf in the Venice Room.

You do not have to hang the leaves downward either. Run them sideways and the same detail sits on a picture frame or a cabinet door.

Loctite spray adhesive standing upright on the sawn blank, the foliage still nothing more than pencil outline.

What holds a blank this small while you cut it?

Glue it to a scrap of plywood through a sheet of ordinary printer paper. Spray adhesive on the board, paper down, spray again, blank on top. Half inch plywood, 12 mm, is plenty.

Screwing a small blank to the bench is how people break them. The paper sandwich holds tighter than you expect and then splits along the paper when you tap a chisel in from the side.

Use a medium strength adhesive, not the strongest one on the shelf. I reach for Loctite. Titebond and a brush work too, they just take longer to clean off. What you want is a spray that actually sprays, because some of them spit and you end up with lumps under the wood.

Does that sound too weak for real work? The four foot lion heads in one of my other classes were held on paper and plywood, nothing else.

Marker lines lay out the ribbon across an offcut.

Which tools really cut this ornament?

One family of gouges carries almost this entire piece, and it is the number 11. I keep three within reach at 0.5 mm, one millimetre and three, and everything else on the bench is support.

ToolWhat it does hereSizeWhy I reach for it
Number 11Sets every line and cuts every shadow on the piece0.5 mmGets under an edge that nothing else will reach
Number 8Rings the flower centre with a crowd of tiny chops1.5 mmSmall enough that those cuts can crowd together
Number 1Refines the middle, cleans it, rounds the cuts over1.6 mmNarrow enough to survive a centre this fragile
Number 7Domes the middle of the oval in one sweep20 mmWide sweep, and the roundness comes out gentle
Number 9Opens the two holes that turn wood into a bow6 mmFaster than a drill and truer to the shape

That smallest one is what I would never give up. Members who have watched me for years know it turns up in every project I touch, furniture or ornament, and it is the difference between a shadow and a scratch.

Two shafts lie across a roughed blank, and the bend on the nearer one is only about six millimetres.

I do use two antique short bends for the flower twists. The bend on them is only about six millimetres, a quarter inch, and you will probably never find one. Buy it if you do, even if the price hurts. Everything on camera here was cut with normal tools, so nothing in this project depends on them.

A curved blade and a straight one laid together over the finished flower.

The other tool worth naming is my own, a Sekira, built on the Gonzalez idea. A normal skew has one bevel. This one has several, so I can work off the heel, the middle or the point, and the point is what reaches into a corner that no gouge will enter. If your knife will not hold an edge through work like this, that is a sharpening problem and not a steel problem.

What order do you cut a flower this small in?

Set the outline with a number 11, then cut the shadow before you shape anything. The flower is about 25 mm across, an inch, and it carries five petals. Three climb and curl back, two drop away.

A needle thin gouge, held between finger and thumb, works the small flower while the oval beside it stays flat.

Why not five the same? Five identical petals would be boring, and the ones that fall throw shadow across the ones that rise. That contrast is the entire reason the flower reads from across a room.

Rough ring of torn fibres where the flower centre will go.

The centre gets a ring of straight down cuts from a number 8 at 1.5 mm, packed tight, so it looks like something growing out of the middle. Then cuts running inward. After that, with patience, a 1.6 mm chisel to round every one of those cuts.

Most of that will never be seen by a human eye at normal distance. I do it anyway.

Chips lift as the blade enters.

Roll the petals using a number 3 around 6 mm. The middle of each petal stays high, like a small hill, and you hollow underneath the wavy edge so the light has somewhere to fall. Do not chase a perfect edge. Look at a real flower up close and nothing about it is even.

Steel meets the flower head on, petals already rolled back, the ground around them dropped away into shadow.

What do you do when the middle keeps snapping off?

Flood it with thin cyanoacrylate and let it soak into the fibres. Two drops in the centre is enough, and it stiffens the grain where it is weakest.

One condition. Only do that if the piece is going under paint, lacquer or shellac, because the glue changes how the wood takes a finish. This one is paint grade, so I have nothing to lose.

It did not save mine. I lost the centre anyway and cut a new one slightly lower, and you would never know. That happens, and it is not a disaster.

From above: one spray already cut, its twin still only pencil, circles marking where each berry will sit.

Why does every leaf tuck under its neighbour?

Overlap is depth, and depth on a piece 22 mm thick has to be faked with shadow. Each leaf tucks under its neighbour, each berry sits on a stem, and every stem stops in the middle of its element rather than running to the tip.

Rounded, then hollowed, a leaf runs into its berry.

The section through a leaf is always the same shape. Convex, then concave either side, then a groove down the middle, then blend it until no facet survives. Back bent gouges earn their keep here.

Watch the grain when you undercut a leaf tip. Push from the wrong side and it breaks, and there is no gluing it back so it looks right. Come at it from the other direction and take less.

Carving grapes feels almost identical. Same problem, same answer, and if you have done a flower rosette with me you already have the hands for it.

Clamped to the bench with dome and foliage finished, a squeezed lump of clay waiting below for the ribbon.

Why does a carved bow defeat so many people?

Squeeze one out of plasticine first. A bow is genuinely three dimensional and it defeats people in my in person classes more than anything else on the piece.

The clay takes two minutes and it does not need to be pretty. All it has to show you is the twist. Which loop crosses over, which slides under, where the ribbon turns back. Then you look at your lump of clay instead of guessing, and the wood stops being frightening.

Open the two centres with a 6 mm sweep. Drilling works too. Two holes, and the thing already reads as a bow before you have shaped anything.

Then keep the two sides different. On mine, one side runs downhill and returns, and the other drops and climbs. Matching them would kill it.

Five petals carved, a ribbon loop either side.

What did Grinling Gibbons do to a bow that most carvers skip?

He cut a second set of grooves running across the first ones. Look at the ribbons in his work. The surface is never one smooth sweep. Cuts run across the main movement, and those are what make a flat ribbon turn in space.

I cut those with a 10 mm sweep, near enough three eighths, changing direction between the two sides. Ten minutes of work, no more. Skip it and you have a lump where a ribbon should be.

If you want to see the real thing rather than my version, the V and A collection is the place, and I teach a whole Gibbons class of my own.

Dividers walking the bead border of the almost finished piece, which sits on its blue backing board.

What spaces a row of beads evenly by hand?

Walk them round with dividers and hide the error in one place. Leave a 3 mm border, an eighth of an inch, then make each bead about 6 mm, a quarter inch.

Set the dividers off the beads you already cut on the first piece, then step around the oval. They will not come out exactly even. Mine finished about half a millimetre out, and I hid the difference at the point where the two runs meet, low down where nobody looks.

The cuts themselves are knife work. Angle the blade slightly, pull the cut, then flip the knife and lift a chip a shade over a millimetre off the other side. That frees the border from the body. Then round each bead, one direction, back the other way, and finally a cut running into the middle.

Plain paper across the carved oval.

Where is the centre of a shape you already carved?

A strip of paper beats calipers. Drywall seam tape from any hardware store is stiff enough to hold a line and thin enough to slide under an undercut where a caliper leg will not go.

Mark a reference on the edge, flip the strip, mark the other side, and the centre sits between your two marks. Four reference points and you have both axes. Nothing elegant about it. Right every time, though, even on a shape that already carries a dome.

Transfer the drawing with a quarter of the pattern and carbon paper, keeping the two lines you just found. All the transfer method costs you is a black mess to clean up afterwards.

Pencil hovering over the roughed composition, marking where the next cut goes.

Why bother texturing the background?

A flat ground and a carved ornament read as one lump until you break the ground up. Punch it and the difference is enormous, far more than the effort deserves.

Punches waiting beside the finished oval.

I use punches and a plain carpenter's hammer, never a mallet, because the mallet is wood and the punch is steel and one of them loses. Some of mine are modified. I ground a two row punch down to a single row and filed a couple of notches into it, which lets me reach in under an undercut where a full face will not fit.

Face down now, the piece thinned from behind, torn paper still clinging where glue held it to plywood.

What stops an undercut ruining hours of work?

Take the shadow from the front first, then pop the piece off the paper and thin it from the back. Three ways in, and I use all of them on one piece.

Lay a number 11 on its side and it clears the bulk. Switch to a 6 mm number 5 and you slice in an arc, like working a dome, which moves a surprising amount at once. The Sekira point gets into the small triangles where nothing else fits.

Two rules and I mean both of them. Never put your hand in front of the tool, because it will slip and you will find out why I say it. And once the piece is off the board, use smaller tools than you think you need, hold it in your fingers rather than clamping it, and take less each pass. You can break a piece after ten hours of work in one second on the back side.

Leave a glue line. Whatever you thin, keep a flat area for mounting, or you will have a beautiful ornament and no way to attach it.

Is this a first project or a fifth?

Not your first. Carve something flat before this. Anyone who has finished a plate with a knife or a simple antique rosette, you are ready.

The hard part is not any single cut. Everything is small, so a slip costs more, and the whole piece is built out of shadow rather than height, which takes judgement that only arrives from having done it badly once.

Mine goes under paint, so I sand. Abranet at 180, then 240 or 320, and never anything coarser. If sanding offends you, spend the time with a flat gouge instead and the result is better anyway. Neither answer is wrong.

So there is a panel somewhere in your shop with a gap in the middle of it. What goes in that gap? Come and carve it with me, and bring the six gouges you already own. Shall we carve?

How it's done

  1. Mount the blank on a sacrificial board. Adhesive, paper, adhesive, wood. Twelve millimetre ply underneath. Choose a medium tack spray rather than the fiercest one on the shelf, and the joint will let go cleanly later under a light tap.
  2. Draw the whole composition on the wood. Find your two centre lines, transfer a quarter of the pattern with carbon paper, then flip it for the other three quarters. Let the two halves of the pair stay deliberately unequal.
  3. Cut the small flower first. Score the outline, ring the middle with tight straight down cuts from the smallest number 8 you own, then roll three petals upward and let two fall. Every petal keeps a high spine.
  4. Shape the leaves and their berries. Convex across the middle, concave either side, a groove down the centre, then blend until no facet is left. Each stem stops halfway along its element rather than running to the tip.
  5. Model the bow in clay, then cut it. Squeeze a plasticine mock up so the twist sits in front of you. Bore the two centres out at a quarter inch. Let the two sides of the ribbon stay unlike each other.
  6. Add the second set of grooves. Run shallow cuts across the main movement of the ribbon, changing direction from one side to the other. Gibbons did this and it is what turns a flat loop into something that moves.
  7. Walk the bead border round. Leave an eighth of an inch of border, set dividers to about a quarter, and step around. Angle the knife, flip it, lift a thin chip, then round every bead. Hide whatever is left over down low.
  8. Texture it, undercut it, then free it from the board. Punch the ground with a carpenter's hammer. Take the shadow from the front, tap the piece off the paper, and thin the back with small tools held in your fingers. Keep a flat glue line.

Frequently asked questions

Do I need special tools for a rosette this small?

Ordinary gouges cut everything you see here, and I say that having used two antique short bends on camera. The tiniest number 11 you can buy, plus a one and a three, one small number 8, a narrow chisel and a single flat tool will carry you through.

How thick should the wood be?

About 22 mm, seven eighths of an inch. Not an arbitrary number. The highest point of the rosette wants to sit right at that thickness, so the dome has somewhere to go and the ends of the leaves can still rise where a moulding runs behind them.

Why glue the blank to plywood instead of clamping it?

Clamps break small work. Ordinary paper sandwiched between the wood and a ply offcut, sprayed on both faces, grips far harder than anybody expects and then lets go under a tap from a chisel. My four foot lion heads hung on nothing else.

Alexander Grabovetskiy

About the author

Alexander Grabovetskiy

Master Wood Carver · Founder, School of Wood Carving

Alexander Grabovetskiy is a master wood carver, named International Woodcarver of the Year. He carves classical relief the old way, from acanthus leaves to full Baroque ornament. He started the School of Wood Carving, a nonprofit, to hand these skills to anyone ready to pick up a gouge.

Follow

What to carve next

  • Venetian Flowers Rosette, the neighbouring detail
  • Advanced Carving, the Venice Room this came out of
  • Carving an Antique Style Rosette
  • All About Tools for Wood Carving
  • Principles of Design in Wood Carving
  • Every lesson on the site, mapped

Shall we carve?

Ready to carve?

Turn reading into doing

3,000+ video lessons waiting for you — start today for $25/month.

Table of Contents

  1. What is a chamomile and bow rosette?
  2. Key takeaways
  3. Where does a piece like this actually go?
  4. What holds a blank this small while you cut it?
  5. Which tools really cut this ornament?
  6. What order do you cut a flower this small in?
  7. What do you do when the middle keeps snapping off?
  8. Why does every leaf tuck under its neighbour?
  9. Why does a carved bow defeat so many people?
  10. What did Grinling Gibbons do to a bow that most carvers skip?
  11. What spaces a row of beads evenly by hand?
  12. Where is the centre of a shape you already carved?
  13. Why bother texturing the background?
  14. What stops an undercut ruining hours of work?
  15. Is this a first project or a fifth?

Is the bow harder than the flower?

For most students, yes. A bow is genuinely three dimensional and there is nothing to copy from. So I model one in clay first. Two minutes of squeezing shows you which loop goes over and which goes under, and the wood stops being a guess.

Do the two halves have to match?

They should not match. I made mine different from the first cut and the edges wander on purpose. Matched halves read as machine work. Keep the overall distances close so the pair still belongs together, then let every leaf differ.

Can I use this ornament somewhere other than a panel?

Yes, and the foliage is the part worth reusing. Nothing whatsoever forces those sprays to hang downward the way mine do. Turn them sideways and the same sprays sit on a picture frame, a cabinet door or a headboard. The bow works on its own too, and I have put it on sunflowers.