
Skip to content
School of Woodcarving
Start HereCoursesLessons MapIn PersonLiveContact
School of Woodcarving
Start HereCoursesLessons MapIn PersonLiveContact

Course Content

Carving Grape Onlay
Not startedCarving Grape Onlay 1
Not startedCarving Grape Onlay 1-1Not startedCarving Grape Onlay 1-2Not startedCarving Grape Onlay 1-3
Not startedCarving Grape Onlay 2
Not startedCarving Grape Onlay 3
Not startedCarving Grape Onlay 4
Not startedCarving Grape Onlay 5
Not startedCarving Grape Onlay 6
Not startedCarving Grape Onlay 7
Not startedCarving Grape Onlay 8
Not startedCarving Grape Onlay 9
Not startedCarving Grape Onlay 10
Not startedCarving Grape Onlay 11
Not startedCarving Grape Onlay 12
Not startedCarving Grape Onlay 13
Not startedCarving Grape Onlay 14
Not startedCarving Grape Onlay – Final Assessment
Carving Grape Onlay

Carving Grape Onlay

New to carving? Follow the guided Start Here path →

This course includes full video lessons plus downloadable patterns and materials, available to members. Log in or come carve to see everything.

More about this course

Alexander Grabovetskiy, woodcarver, School of Woodcarving · Published 2024

How do you carve grapes and grape leaves in wood?

Quick answer: Grape onlay carving is relief work where a cluster of grapes, leaves and vine is carved on a separate basswood board and then applied to furniture or a mantel. Berries sit at different heights, every gap between them is shaped as a triangle, and each pass slices sideways instead of pushing straight down.

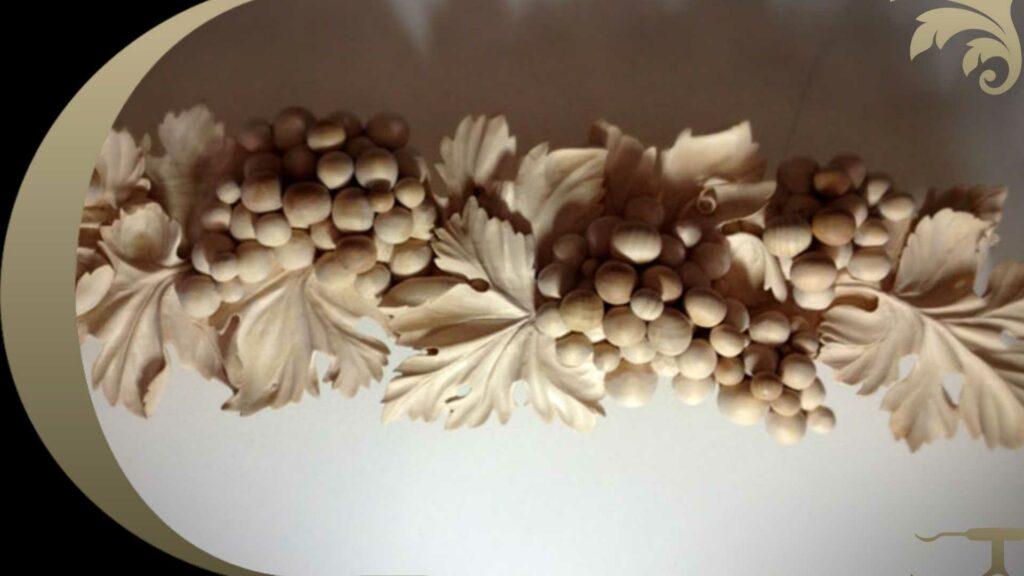
Finished grape onlay lying flat on the workbench with a hand steadying its right end
Share

A grape onlay is a bunch of grapes, leaves and vine carved on its own board and then fixed to something else, a mantel, over a kitchen hood, or above a door. My board is basswood, 24 inches long and just under 2 inches thick. Thickness is the whole point here, because the grapes have to sit at several different heights and a thin board simply cannot hold them.

Have you carved grapes and ended up with a plate of flat coins? Did the gaps come out square instead of pointed? Does the wood tear at you every time you go deeper? I taught this panel in an in-person class, and afterwards people kept writing to ask if I would put the same project online. So here it is. Grapes are not easy. I have watched carvers who handle an acanthus leaf without breaking a sweat get into real trouble with one bunch of fruit, and it is nearly always the same handful of things going wrong. Below is how I carve them, which gouges I reach for, and the mistakes I see in every class.

Roughed out class panel clamped to the bench, printed pattern still stuck across two grape bunches

What decides whether a bunch reads as a bunch

  • Rough out the whole movement first. Working details at the start is the biggest mistake I see, every class.
  • Pick one grape as the high spot, then let the rest drop away from it.
  • Make them different sizes. A row of matching circles reads as fish scales, not fruit.
  • Where two grapes meet, aim for a triangle. A square gap between them is one you will never clean out properly.
  • Slice. Never take the tool straight down at 90 degrees.
  • How wide a grape looks from above is how deep it goes. Not deeper.

Why do carved grapes come out looking flat?

Flat grapes come from carving every one at the same height, like coins laid on a table. Real fruit does not do that. In a bunch, some berries push forward at you and some hide behind their neighbours, and the wood has to do the same thing.

So the first decision is not a grape at all. The first decision is which grape sits highest. I chop that one slightly proud, and from there the whole bunch runs downhill, downhill, downhill. Once you have a high point, every other height in the piece has something to measure itself against.

Size is the second half of it. Make them random. Some bigger, some smaller. If they all come out the same you get what I call the fish scale effect, and it kills the whole panel. Wood carving is not a copy of real life anyway. Carving sits closer to interpretation, the way relief carving has always stylised what it shows.

Thumb on the grape carved clear of paper

I think of it as building a house. Stage one is the basement, the overall movement blocked in with big tools. Stage two is framing, where the bunches get their real shape. Details are the roof, and nobody roofs a house before the basement is poured. Yet that is exactly what people do with grapes. They pick one berry and polish it while everything around it is still a lump.

What board do you need for a grape onlay?

Basswood, and plenty of it. In Europe the same tree is sold as lime wood, and you will also see it called linden. Whatever the label, it is Tilia, and it takes deep excavation without fighting you.

The board for this project is 24 inches long, which is 61 cm. Six inches wide, so 15 to 16 cm. Glue up to that width if you need to, since one plank is not required. Thickness is where people go wrong: you want eight quarter stock, close to 2 inches. Mine measures 1 and 7/8, about 4.76 cm. If you can find 5 or 6 cm, take it. Depth is what buys you the third dimension, and a thin board hands you circles no matter how well you carve.

Overhead view of the panel once most berries are blocked in, with only two patches of pattern still left

Dry stock helps. My piece is dry, so I do not have to baby it. Wet or freshly milled wood keeps moving on you as it gives up moisture, and the Wood Handbook will tell you more about that than I can. Basswood is soft, which is why it carves so kindly and why a scraper barely touches it. Look up its numbers on the Wood Database and you will see how far down the Janka scale it sits.

One more thing before any tool touches it. Take a leftover block and carve three or four practice grapes on it first. A few practice berries there will save you real regret on the good board.

Which gouges carve grapes?

Two gouges do most of the work here, and neither one is exotic. A number 7 at 14 mm rounds each grape. Blocking in falls to a number 5, somewhere around 12 or 13 mm across the edge. Own neither and you do not carve grapes yet, so that is where the money goes first.

ToolSizeWhat it does here
Number 920 mm, and 25 or 30 mm is better stillRoughs the whole movement out
Number 910 mmLowers the ground, working across the grain
Number 714 mm, a shade over half an inchThe main tool here, it rounds each grape properly
Number 512 or 13 mm, about half an inchBlocks in
Number 11 veiner4 mm, down to half a millimetreOutlines, veins and undercuts
Skew, or a plain number 1 chiselabout an inch acrossCleans the walls between grapes and blends a shape smooth

Amber handled gouge held against the nearly finished run of grapes

Brands matter less than people hope. Mine are a mix: Ashley Isles for the steel, which holds an edge like nothing else I own, plus Henry Taylor, some tiny Dockyard tools, an antique spoon gouge by Herring Brothers, and a few from Pfeil. A number 12 Pfeil knife is a good knife to own if you are buying one. My own knife on this panel is cheap and it works fine. What is not optional is sharp. I go over to a strop with honing paste constantly, because every rule below assumes the edge is doing the work and your arm is not. If your kit is thin, start with the tools course before this one.

Where two grapes meet, aim for a triangle

Grapes touch each other, and the shape of that meeting decides whether you can finish the piece. I call it the marriage point. Look at any three berries pressed together and you get a small three cornered hollow between them. Aim for that. Try not to get squares.

A triangle has an open corner, so a blade can reach the bottom of it and lift the chip out. A square hollow has four walls and no way in. You will be picking at it with a knife point forever and it still will not look clean.

Yellow pencil marking where berries touch

I carve those triangles before I round anything. Corner of the tool goes into the hollow, slicing motion, chip away, almost like chip carving. Once the triangles are established across a bunch, I work from the outside inward and bring each grape up to a true sphere. Not perfect, though. Sometimes a square connection happens anyway, and it is not the end of the world. Cleaning one is still possible. Just do not go choosing it on purpose.

Knife blade working down into the gap between two blocked in berries, a pencil lying on the bench

Do not outline a grape either. People take a small veiner, trace right around the berry, and think they have separated it. What they have done is damage the wall of the sphere they were about to carve, and there is no fixing that. The separation comes from the triangles, not from a groove.

Never take the tool straight down at 90 degrees

Every angle on this panel leans. None of my passes go straight down into the wood, and that is really, really important to understand. The blade always aims toward the next grape, roughly 45 degrees, never square to the surface.

Think about what happens underneath. A gouge is a wedge. Stand it upright and push, and you are forcing that wedge into standing fibres with your shoulder. Looks like carving. Feels like carving. What it actually does is build stress into wood you have not shaped yet, and on anything harder than basswood it will split on you.

Gouge held flat to the panel while the first berries are blocked in

The other reason is access. Lean every wall in toward its neighbour and the hollow between grapes stays open at the top, so a tool can get underneath later. Chop straight down and you have made a well with vertical sides. I know that in life you sometimes see grapes with real voids between them, and the temptation to copy that is strong. Ask yourself first how you plan to clean inside it. Most of us do not own a tool that reaches in there anyway.

How do you carve deep without fighting the wood?

Slicing. Never pushing. Picture a clock face on the end of your gouge: I start with the flute over at 11 and finish the pass near 1, so the edge travels sideways through the fibres instead of crushing them. Start at 12 with the flute straight up and you are back to shoving a wedge.

Blade entering the paper on a slant

Half the time I am only using one corner of the tool, and even then I keep it moving sideways. Listen to it. A clean slice sounds different from a tear, and the surface it leaves comes off shiny rather than fuzzy. No pressure at all, just the sharpness.

Go little by little into a neighbouring grape. Deeper is always available tomorrow; the wall you crushed today is not coming back. And when the grain fights you, stop and come at the same spot from the other side. Attacking from both directions is nearly always better, because grain direction reverses depending on which way you travel.

Wide chisel taking one light shaving off a single berry, with facets left by earlier passes still showing clearly

Depth has a rule too. However wide a grape looks from above, that is how deep it goes, and no deeper. Go past that and you have opened voids you now have to deal with, and the bunch starts to hollow out instead of swelling.

Turn the panel over and carve the back

The undercutting is where a grape onlay stops being a picture and becomes an object. I flip the whole thing over, clamp it, and start excavating underneath. Before that I make sure a few high points stay proud, because once it is face down those spots become the legs it rests on.

Back of the panel, turned over and clamped to reach the undercuts

I argue for more undercutting rather than less. Cutting through those long fibres relieves the stress running along the board, so there is less chance of a crack showing up later on. Wood moves with the seasons wherever you live. Think of the grain as bundles of tiny straws carrying juice up the tree, and undercutting as breaking that run before it can pull something apart.

Leave about a quarter inch, 5 or 6 mm, of thickness behind a grape and you will be fine. Some of my tendrils end up nearer 2 mm, and a couple of spots are thinner than that, but those are choices made with the tool in hand and both eyes on the piece. Holding the work gets awkward at this stage. I use double sided tape made for CNC work, XFasten brand, never carpet tape, which grabs so hard it snaps the fragile parts when you lift the piece off.

XFasten tape roll above the carving

Things break here. I broke a section on this very panel and had to glue in a new piece with hide glue and carve it again. Another time I attacked from the wrong side because I did not want to move the bench under the cameras, and a piece snapped clean off. Change of design. It happens, and it is not the end of the world.

Shadow is the material you are really carving

Wood carving is all about light and shadow. You are not carving wood so much as arranging where the dark falls, and you cannot fake that with color. Deeper you go, the more dramatic it looks.

Side light throwing deep shadow right through the bunch while a small veiner works into a carved leaf

That is why an undercut of 2 or 2.5 mm reads so much stronger than 1 mm. Same shape from the front, completely different piece under a lamp. Check your work from other angles constantly, not just straight on, because light in a room does not arrive from where your eyes are.

The leaves follow their own rules. Wherever two lobes come together you get what I call an eye, and every eye must have a raised part running out of it. That ridge has a name, and I call it the pipe. The same law holds on a grape leaf as on acanthus, and it is what keeps a leaf from going flat. Every leaf also bulges in the middle. Three main lobes, and inside each of those, three more separations.

Close view of a vine running across the berries

Composition follows the golden ratio without me thinking hard about it. Take two points across the panel and the heaviest bunch lands near 62 against 38, which is the golden ratio, on a diagonal. If that sounds abstract, my design course spends real time on it, and the same proportions run through every Baroque panel worth studying. Grinling Gibbons is who I keep coming back to for fruit and foliage. He is next on the list of things I want to film for the school, once this panel is off the bench.

Whole panel with every cluster blocked in, plus a mechanical pencil lying on the bench just above it

Sand the grapes, keep the marks on the leaves

Finishing is your decision, not mine. Where the piece will hang decides most of it. Put it on a painted mantel and you paint it. My own panels lately have been shades for a pipe organ heading to New York, and those are going under authentic oil based gold leaf, so they get sanded properly smooth first.

Abranet P240 mesh beside a purple 3M sheet

For the grapes themselves I do like a little smoothing. Abranet by Mirka at 240 grit is what I reach for, and lately a purple 3M automotive sheet at 220, which leaves less grit buried in the wood and is kinder to the tools afterwards. Never go below 100, and honestly 120 is my floor. Go lower and you spend all afternoon chasing scratches back out again.

Orange sponge across the berry tops

After the paper, a Mirka sponge at 4000 grit over the tops of the berries only. That gives the shine right where light would catch real fruit. Be careful with it.

The leaves I leave alone. Tool marks are the nature of this work, and if you sand everything smooth nobody can tell a hand did it. Some rough spots earn their place. Knock the worst facets down lightly, then stop. Do not be too crazy.

Is a grape onlay too hard for a beginner?

Grapes are more advanced than almost anything else I teach, and I will not pretend otherwise. There is a lot of movement in this panel and a lot of deep relief excavation. In person it fills a week, four and a half days of bench time, and even then it is only one week of result.

Narrow gouge shaping the pointed tip of one leaf, right beside a brass clamp holding the panel edge down

Take it anyway if you want a real challenge. Nobody starts ready. If your hands are new to this, spend a few weeks on first passes for beginners or the bird of paradise board, then come back here. Prefer to work up through fruit? Hazelnuts are gentler, and the Cabernet tray puts grapes on a smaller stage. Whatever you carve, take your time. Patience is the most important thing in this craft.

Alexander at his bench in a leather apron

One last thing, and it is my favourite part of finishing this piece. People pick it up, look at the vine passing over and under the bunch, at the leaves lifting clear of the ground, and they assume it was assembled from parts and glued together. Turn it over and show them the back. Then watch the face change, because what they are holding is one board, worked from a single piece of basswood.

Shall we carve?

The full course runs 14 workshops plus a final session, and it picks up from a panel that is already roughed out, so nothing is wasted on ground you have covered. See where it sits beside everything else on the lessons map, or pick a starting point on the course list. If you would rather stand next to me while we do it, the in-person classes fill quickly. Tuition for the whole library is on the access page.

How it's done

  1. Rough the movement. Take a 20 mm number 9, or bigger if you own one, and block the whole panel in. High spots come first, then everything else falls away from them. Details stay untouched at this stage.
  2. Frame the clusters. Set each cluster at its own height and decide which berry sits proudest. Sizes stay random, since matching circles read as a pattern instead of fruit. Framing a house works the same way, walls before roof.
  3. Excavate the triangles. Put the corner of a number 5 into the three cornered hollow where berries press together and slice the chip free. Those hollows get carved before anything is rounded, because a blade can still reach into them.
  4. Round each berry. Switch to a 14 mm number 7 and work from outside inward until every berry reads as a true sphere. Slice sideways flute rotated from eleven round to one, and let sharpness do the work.
  5. Undercut from behind. Flip the panel, clamp it on its high points, and hollow underneath with a small veiner. Leave roughly 5 mm of wood behind each berry. More undercutting means less chance of a crack years later.
  6. Sand only the berries. Abranet at 240 grit over the fruit, then a 4000 grit sponge across their tops for the shine. Leaves keep every tool mark, since sanding them flat hides the hand that made the piece.

Frequently asked questions

Can a beginner carve a grape onlay?

Grapes sit at the advanced end of what I teach. Plenty of movement, plenty of excavation, and a full week of bench time when I run it in person. Try it anyway if you want a real challenge, though a couple of simpler reliefs behind you will help.

What wood should I use for carved grapes?

Basswood, sold as lime wood across Europe and sometimes labelled linden. Softness is what lets you excavate deep without the panel fighting back. Eight quarter stock, close to two inches, gives a cluster the depth it needs, and five or six centimetres is better still.

How deep should each carved grape go?

Depth matches width. However wide a berry looks from directly above, that is how far down it travels, and no further. Push past that and you open hollows nobody can reach into, while the cluster starts to look scooped out rather than swollen with fruit.

Alexander Grabovetskiy

About the author

Alexander Grabovetskiy

Master Wood Carver · Founder, School of Wood Carving

Alexander Grabovetskiy is a master wood carver, named International Woodcarver of the Year. He carves classical relief the old way, from acanthus leaves to full Baroque ornament. He started the School of Wood Carving, a nonprofit, to hand these skills to anyone ready to pick up a gouge.

Follow

What to carve next

  • Carving Vase with grape leaves
  • The Tray of Blessing, Cabernet Sauvignon
  • Carving Hazelnuts
  • Carving Tool Sharpening
  • Principles of Design in Wood Carving
  • Grinling Gibbons, Class in Maine
Share

Shall we carve?

Ready to carve?

Turn reading into doing

3,000+ video lessons waiting for you — start today for $25/month.

Table of Contents

  1. What decides whether a bunch reads as a bunch
  2. Why do carved grapes come out looking flat?
  3. What board do you need for a grape onlay?
  4. Which gouges carve grapes?
  5. Where two grapes meet, aim for a triangle
  6. Never take the tool straight down at 90 degrees
  7. How do you carve deep without fighting the wood?
  8. Turn the panel over and carve the back
  9. Shadow is the material you are really carving
  10. Sand the grapes, keep the marks on the leaves
  11. Is a grape onlay too hard for a beginner?

Why do my carved grapes look like fish scales?

Matching sizes on one flat level cause that. Vary every berry, set a few proud and drop others behind their neighbours, and the cluster stops reading as a repeated pattern. Real fruit is never uniform, and carving that pretends otherwise goes flat under any lamp.

Do I need to sand a carved grape panel?

Partly. Berries take a little 240 grit plus a fine sponge across their tops for the shine. Leaves keep every mark the gouge left, since smoothing those away hides the hand behind the work. Dropping under 120 grit only buys scratches you chase afterwards.