

Alexander Grabovetskiy, woodcarver, School of Woodcarving · Published 2019
What is a multi level background on a carved panel?
Quick answer: A multi level background is a ground carved to different depths in different areas of one panel. On my walnut furniture panel I took it 1/16 inch (1.5 mm) in a shallow band, 1/8 inch (3 mm) above the main design and 3/16 inch (5 mm) inside, because 18th century panels a lot of times show that.
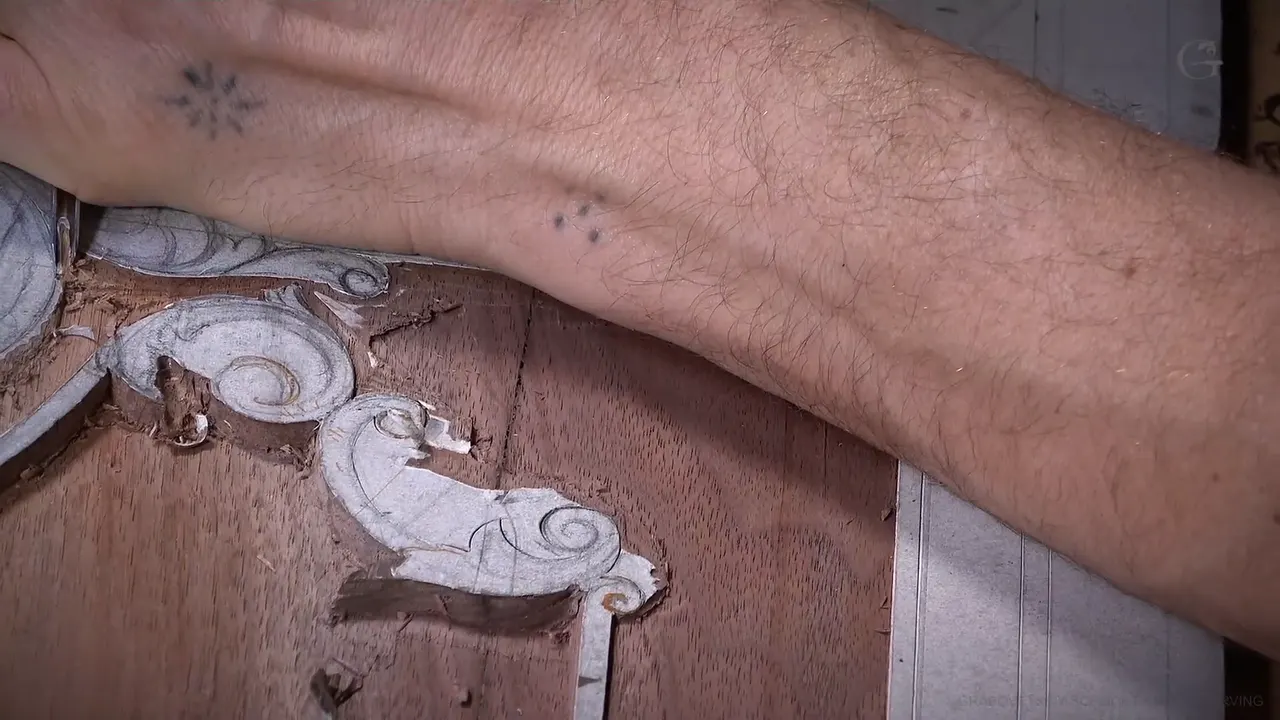
A background on more than one level is a ground that sits at different depths in different areas of one panel. In lesson 17 of my furniture panel carving course, on the purple walnut panel I designed earlier, I set three of them. Around one element the ground goes only 1/16 of an inch deep, about 1.5 millimeters. Over the main design it's an eighth, 3 mm, the same as we did before. Then I jump inside and make it deeper again, to three sixteenths. That's five millimeters.
Want the leaf on top to stay the high spot? And the molding to stand a sixteenth above the ground right beside it? Then that ground can't sit at one depth everywhere. On this panel it doesn't.
Nearly everything below comes from this one lesson, in the order I did it, with the tools I picked up and the words I said on camera.
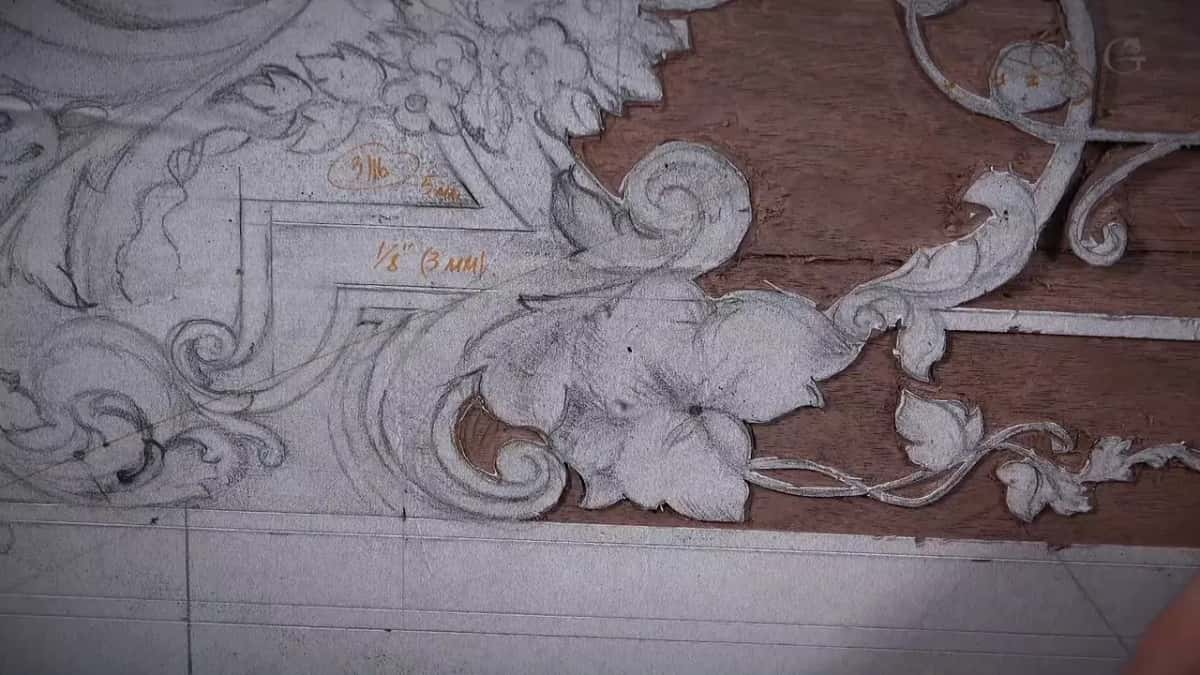
Three depths and a molding, the short version
- Depths of 1/16, 1/8 and 3/16 of an inch, roughly 1.5, 3 and 5 millimeters.
- By the molding on the opposite side, the ground sits a sixteenth below it, and the flipping-over movements stay higher still.
- A knife outline first, more fluid than deep.
- Gouges across the grain, stopping before the line and escaping upward.
- A router plane for one even depth everywhere.
- Shallow work is sometimes harder to control, and it doesn't take less time.

Where do the three depths go on this panel?
They go in three places, and the deepest part, in the middle, was already done when this lesson opened. Lesson 16 comes right before it. The shallow area runs all around one element and stops at a single point. Over the main design it's an eighth. Inside, I go deeper again, to 3/16.
In metric, a sixteenth is about one and a half millimeters. To be exact it's a little more, 1.5875 millimeters, and I gave that number on camera just to be precise. The paper pattern carries the numbers too, in orange pencil. One spot reads 3/16 and 5 mm, and the next one over reads 1/8 with 3 mm.
| Where on the panel | How deep or how far, in my own words | Metric |
|---|---|---|
| The shallow band, all around | Only a sixteenth | About 1.5 mm, or 1.5875 to be exact |
| Above the main design | One eighth of an inch, the same as before | Three millimeters |
| Inside, where I go deeper again | Three sixteenths | Five millimeters, also written on the paper |
| The area by the molding, opposite side | About 1/32 more | Not quite 3 mm, roughly 2 to 2.5 |
| Wood left beside a line | A sixteenth up to 3/32 | From one and a half up to a couple of millimeters |
The pattern for this panel and a depth map have their own lesson, and the drawing itself was finished in lesson 14 of the design course.

Why carve the ground at different depths?
More authentic, that's the first reason. Look at 18th century panels and a lot of times you can see different depth in different areas. I think it's going to look really, really good.
Relief itself, as Wikipedia puts it, is sculpture whose pieces stay attached to a solid background of the same material. On this panel that background simply doesn't sit at one level.
The second reason is on the panel's opposite side. The goal there is to leave the molding a sixteenth higher than the background. But there are flipping-over movements there, and those have to sit a little higher. One part goes underneath a leaf, and we really need to keep that leaf the high spot. The volute has to be a little higher too. So I actually go roughly 1/32 inch (0.8 mm) deeper in that area, not quite 3 mm in all, approximately 2 to 2 and a half.
I changed my mind about one strip while I outlined there. Maybe I should carry the sixteenth all the way along the inside, I said, because that would be a lot more distinguishable. That's what I'll do.
That's really deep, and that is really shallow, but it still has some definition, I said near the close of part seven. Back in part four I said the color makes it less noticeable for now. Later, some areas get texture, and then it shows even more.

Is shallow carving easier than deep carving?
Harder, sometimes. You think it'll be easy because it's only a sixteenth of an inch. But that small depth is sometimes harder to control, so a low relief carving is not always the easiest one.
It doesn't take less time either. Compare one square centimeter, or half an inch or one inch in imperial, and it's similar to a deeper carving. Sometimes it takes more, because you have to control a lot more. You're still spending a lot of time.
I know maybe I'm too careful sometimes. I made too many mistakes before, rushing and trying to do stuff too quickly. Better to take time and remove little by little than to rush it and make a big mistake. Carefully. That's my key word in this lesson.

How do you outline the design before the ground comes down?
With a knife, and not deep. In part one I took a smaller knife, a number 3, and pulled it toward myself. For me it's more important to be fluid, to make a beautiful line, a curvature if you wish.
The wood helps. Back in lesson 15 I said that because this is walnut, a little harder than basswood, my knife doesn't dig too deep. That's an advantage for me, because I know I won't go too deep.
I press on the blade from this side and from that side too, equal pressure, to control my 90 degrees. Not that critical yet, but a good habit to have.

I slipped off the line more than once. There's a chance to fix that later, but the first pass should still be as nice as possible, because I don't want to see a choppy line.
On the other side I picked up my favorite, a number 12 knife, by far my favorite one, even in this job. Held really low to the surface, it doesn't dig as deep and gives me less resistance. It's all about how easily it moves. I carve on a pull, toward myself, and control the blade from both sides again.
Where the curve allows it, a gouge with a matching sweep is quicker than the knife. A number 8 at 1/4 inch (6 mm) was almost perfect in one spot, and a one inch number 7 (25 mm) fit another. If you ever carve these panels for production, record which gouge matched which spot, because that's going to help you a lot.
Those leaves don't have to be perfect leaves, and the outline I carve now is not the final line. That gets settled when the background is done and we jump on the details.

Why not dig a channel along the outline first?
The mark it leaves in the wall is the trouble. You could go all around the design with a little channel, 1/32 of an inch or so, and there are a lot of carvers doing it. That way you see exactly where to stop. It's okay to do, but it's not my preferred method.
The problem, at least what I think is the problem, is that digging inside the wall creates a scratch, a tool mark, in it. If you're not planning to go that low, it won't look as nice, and it won't read as a solid wall.
My way is to step away about a sixteenth, maybe less, even one millimeter, and carve across the grain toward the line. Before I hit the line I stop and escape with the tool, going upward. The next pass starts right in the middle of the previous one, and my passes there took only 1/32 or so.
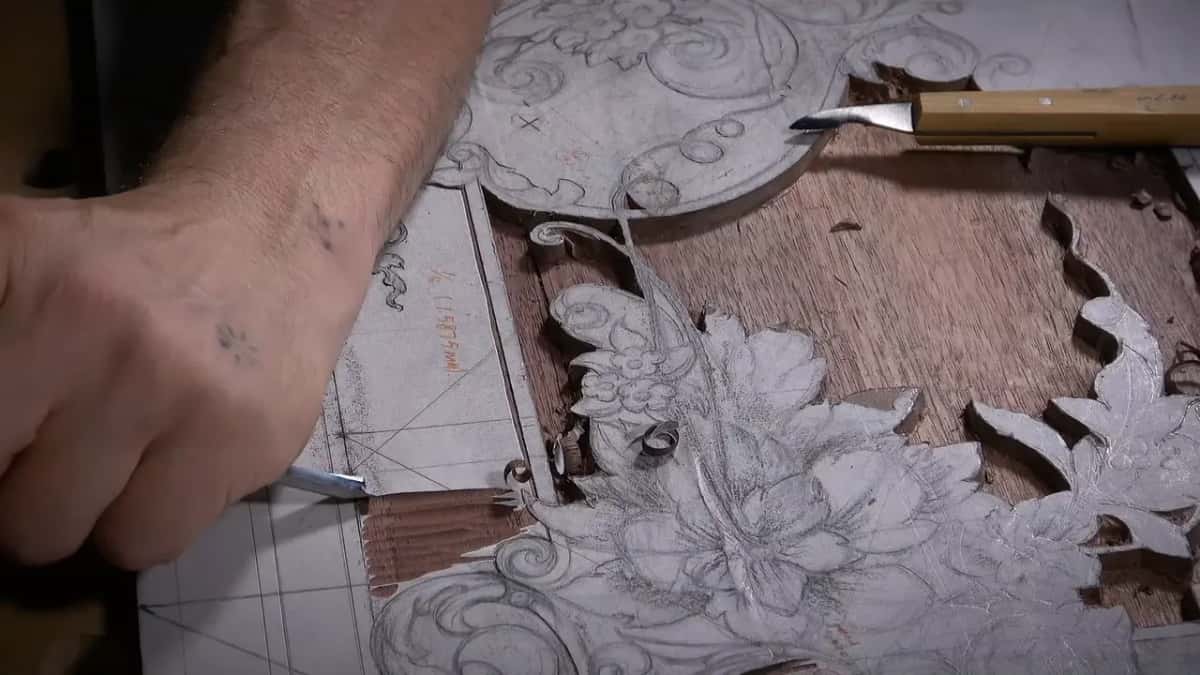
I'm slicing. Even with the number 7 I keep making my rotation movement, and my hand sits solidly on the board, which gives me much more control. Later I held the tool absolutely differently, and the hand still stayed solid.
For shallow work like that I'd suggest a mallet. Like I said many times, it's a lot more controllable, so you control much better how deep you go. A plain hand push gives you a little less control.

What does a router plane do on a shallow ground?
It holds one depth. Wikipedia describes the router plane as a hand plane that planes the bottoms of recesses to a uniform depth. To me it gives true consistency. That's the goal, to be really consistent with the depth. After one cavity I knew for sure it was exactly the same depth inside as right next to it. That is just a beautiful thing.
I reference on one side and make my passes toward myself. Changing the blade and the depth doesn't scare me, because I can always reference the deeper spots I already have. I don't force it either. I raise the blade first, then lower it little by little.

A blade change takes a couple of seconds. In part four I went to a one-eighth inch blade, 3 mm, and said it plainly. If a bigger blade feels uncomfortable, just change to a smaller one.
Check what the grain does as you go, because sometimes you can split it, and that's no bueno. Rather than a straight push, reference one side and move one handle.
Now the anatomy of the blade. At some point it just travels on its heel. When you start, the heel is always on a higher spot, and when you turn and keep going, you'll notice you're still in a place you supposedly already carved, but not really. So change the position of the tool, and work both directions, away from yourself and back toward yourself.

I thanked someone on camera for a link about grinding the heel at an angle. That makes a lot of sense, and more advanced woodworkers do it, though not all of them. In my case grinding the heel would not be enough. I'd need to reshape my blades completely and leave just a slight spot that does the work.
Where I could, I ran the plane at about 45 degrees instead of straight. That's a little safer and gives a better result. Just don't dig too deep on the 45, because you can go into the wall. The blade really has to be sharp, too, since a dull one leaves a lot of tear.
Two brands are my favorites, and that's just my personal opinion. For the feel of the tool, how it looks, maybe even the quality of build, I like Lie-Nielsen the most. My choice number two is Veritas, the tool line Lee Valley makes, per Wikipedia. You can find good ones elsewhere too, I'm pretty sure, and the older Stanley ones are supposed to be really good.

A mini router plane does exactly the same operation, and I use one all the time on a small rosette. The big one has a bigger body, though, so I can reference much farther with it.
And you can do the whole operation with just the gouges, without any specialty tool, if you need to.
Which tools make a clean wall beside the ground?
For a true 90 degree wall I used a number 23 at 4 mm (about 5/32 in). I have four of them, bigger and smaller, and a half inch one, 12 mm, went in on a bigger area. Here the perfect wall is not as critical, because these are details. It's a lot more critical on the molding lines.
This tool, as I said in the lesson, is made for furniture style carving, and furniture makers had it while normal carvers usually did not use it. You get a really nice 90 degree wall without digging underneath.

A veiner does the same if you don't have a number 23. I showed it with a number 11, 3 mm (1/8 in), using only the left side of the tool, so it becomes pretty much like a number 3 for me. My number 11 at 3 mm is a shorter tool, European size, Swiss made, and its handle is stamped D11/3. I called the number 11 irreplaceable for this type of carving, one of the best, as long as you're not digging too deep. For a furniture maker on period furniture, I said, the number 23 would be a good investment. There's a whole course about carving tools.
Don't tap too heavily with the straight chisel, the number 1. The board is only 10 mm (3/8 in) thick, and if you tap too deep you can split it. When one area came out right, I said it in German. Sehr gut.

How close to the line should the ground go?
About a sixteenth away, for now. I leave approximately that, a little more in some spots, like 3/32, so roughly from 1.5 to 2 millimeters, and later I clean it with the router plane, a grounding tool or a tiny 1 mm gouge. I can always make it less later, but I can't make it bigger if I leave too little.
Even at that depth it's still dangerous to come too close to the final line. The main area was only about a 64th of an inch (0.4 mm) deep at one moment, and I still stayed off the line. My first shallow area stopped a little short of the full sixteenth, maybe 1.3 mm, to leave room for a clean pass later on.

I spend a lot of time going around the little details, and there's a reason. Small details fly out faster than the big ones, and that's why they're more delicate, almost like jewelry work. Besides, it's going to look nicer if it's accurate.
We still want the work fine but solid, with no weak points, especially on furniture panels that are going to be used. Even so, in part nine I almost lost a detail. I wasn't careful. It's a tiny, small detail, but it makes a huge difference in how it looks.
When is a carved line right?
When it keeps going. Early on I kept an eye on a line I had just made, to be sure it continues all the way. The human eye can catch that stuff. If the curvature is not tangent, even where it's invisible, then it's no good. It's got to be tangent.

Before the first knife pass of this lesson I changed the drawing. I had doubted one area since the day before. Probably I originally wanted it parallel to a diagonal, but that doesn't look organic. The diagonal is still there. I just don't carry that line any farther now, and with a stopping point there I think it looks much better. We're going to make some changes on the go, like I said.

Part seven ended with me really happy with how it looked. Lesson 18 and lesson 19 keep working on the background of the same panel, the rest continues in Part 3 of the panel, and the design behind it all is in the design course.
If you'd like to carve a panel like this one with me, lesson by lesson, here is access to the school.
How it's done
- Name each depth first. Decide the depths before you carve, as far as you can. Mine were 1/16, 1/8 and 3/16 inch, and the numbers sit on the paper pattern in orange pencil.
- Outline with a knife. Pull it toward yourself and keep the line fluid rather than deep.
- Carve toward the line. Start a millimeter or so away. Take roughly 1/32 inch at a time, stop before the line and escape upward, then begin the next pass in the middle of the last one.
- Level it with the router plane. Raise the blade first, reference one side, work toward yourself, and lower it a bit at a time.
- Stop a little short. Leave room for one clean pass. On my first shallow area that meant about 1.3 mm instead of 1.5.
- Clean to the line later. Keep roughly a sixteenth beside each line, and take it off using the router plane, a grounding tool or a 1 mm gouge once the details begin.
Frequently asked questions
Why keep the chips from a straight chop?
On a straight line I place a number 1 right on the knife mark, tap straight down, then undercut slightly with the same tool so the long chips can be kept for later use. If there's another spot with a crack on the panel, I can use those.
Should the walls be chopped straight down right away?
Only a little. Even in a small area I'm still going to undercut those leaves later, and I don't want to see straight-down marks then. So it's probably better to leave them as they are for now. Once we work on the details, I get closer and adjust.
Can a power router lower the background instead?
A normal power router with a small bit, about 1/16 inch across, gets close almost everywhere, and I've used one myself. I won't judge you for it. For me the router plane is just more satisfying. It makes no dust in my shop, and the sound of hand tools is so nice.
What to carve next