

Alexander Grabovetskiy, woodcarver, School of Woodcarving · Published 2020
Why should carved petals not be perfect?
Quick answer: A petal that isn't perfect is what I was after on the small filler flowers of my walnut furniture panel. If you carve them too perfect, they look artificial, not natural. So the five stayed a little different, the eye of one sat off center, and I dug deep shadows so each flower shows on the dark wood.
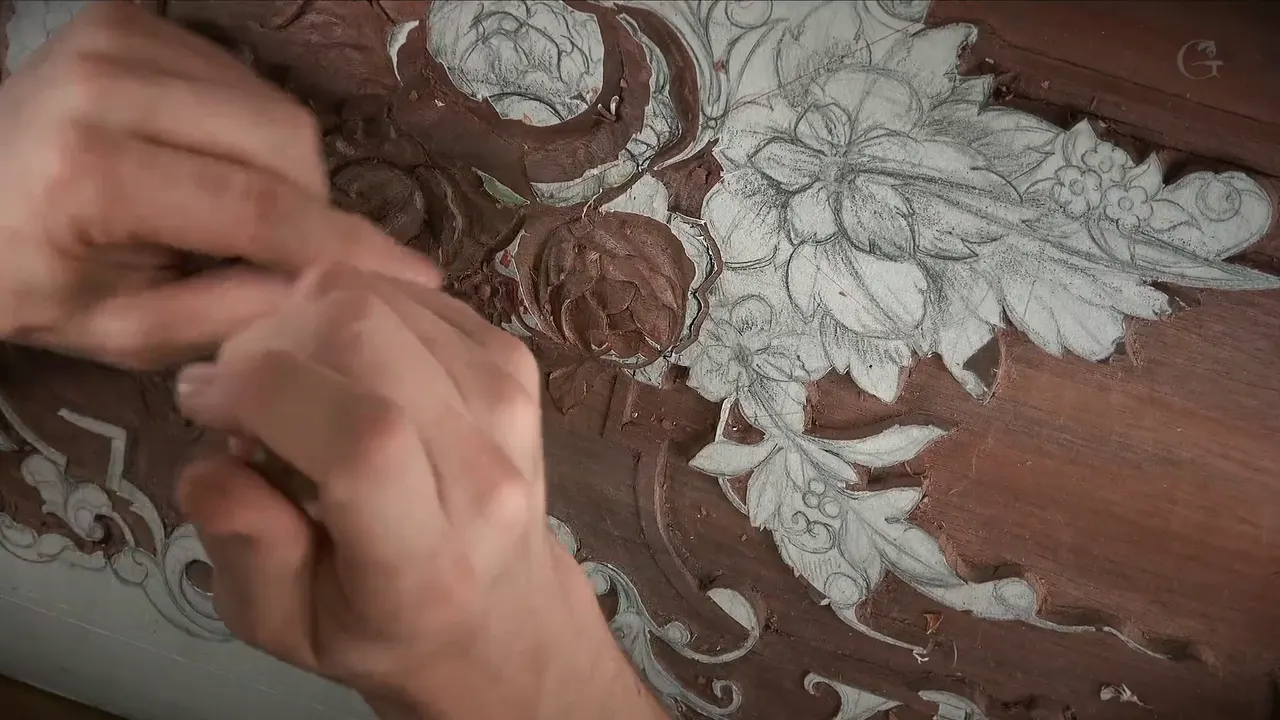
A carved petal that is not perfect is what I was after on the little flowers of my walnut furniture panel. In lesson 24 I told you why, in so many words. If you're going to do those petals just too perfect, it's going to look artificial. It's not going to look natural.
Do you want a small flower on your board to look like it grew there? Would you like it to show up on dark wood, even when it is tiny? Then leave the petals a little different from each other, and spend your care on the shadows around them.
You will see the tools I used on it, and why each one came out.

Uneven petals, careful hands
- Too perfect petals look artificial, so I left mine a little different.
- The flower is only about 10 mm (3/8 inch) across.
- I like to outline first, since a stab is quicker but puts too much stress into the wood.
- One flower's eye sits slightly to one side and points one way.
- With two lights on, the shadow hides, so I switch one off to check.
- Uneven shapes still need careful hands.

What goes wrong when petals come out too perfect?
They look artificial. I said it in part two, while I was creating shadow around the little flower: I know those petals are not perfect, which is what I'm after. So that's why we don't want to do them too perfect.
My petals on this little bloom are not perfect, and that is exactly what I am after. Near the end of the lesson I carved some concaves, like I had done on a leaf, coming from the center outward. Some of them deeper, some of them less deep. And the edge started developing some curliness on its own, a natural almost curliness, which also gave me some kind of movement.
A natural sort of curl, arriving on its own. It was looking excellent, I think, in my opinion, and I showed it to you a little closer.

How small is one of these flowers?
Ten millimeters across, about three-eighths of an inch point to point. Not much distance right there, so every move needs care. I opened the lesson by saying these are really unique flowers, because you can use them anywhere. They are called filler flowers, and you can stick them pretty much in any design.
I drew this bouquet back in Designing Furniture Panel 12, and I worked on the flower next to it in lesson 23. Pretty much the same idea, pretty much the same tools, I said.
The center gets raised as a half sphere, a dome, carved with the same gouge. I went toward that cut a bit at a time, with a slightly deeper excavation on one side. Especially I have to be careful when I'm carving toward the center along the grain, because if I push too hard, I can snap out that middle part, and it will look really bad. Lesson 25 goes on with the dome.

Should you stab the outline of a small flower or carve around it?
Outline first, because it's always better, I said. Step number one is to outline the flower itself and then carve with a different tool underneath it, so the ridge stays a little higher. Like we've done before, you could go around using a number 11.
Then I showed you the other approach, a stabbing cut. I took a number 5 at 3 mm (1/8 inch), placed it straight down, and followed the outline around. Genuinely quick, too. But it's not my preference, because you create too much stress, spreading those fibers both directions, and that is not too good for the wood. For a much quicker job it's acceptable, I would say. Why not?

Next came a number 7 at 4 mm, a little less than 3/16 inch, for a deep cut. I really want to see shadow, and that was a good spot for it, so I went down about 1/16 of an inch, a millimeter and a half or so.
Even with a tool like that, I'm not just pushing. I'm slicing with a slight rotation against the clock in this case, and it could be done with the clock just as well. Impossible to see on video when the cut happens fast. But I do it.

Where did the small differences go on this flower?
Into the separations between the petals, and into the eye. Between those five petals I made a micro cut with a half-millimeter veiner, a number 11, pushing it toward the center to create a little separation. I had to be really careful even there.
For the middle I took a really small gouge, the one I used before, a number 8 at 1 mm by Dockyard. On one side, if you look a little closer, the eye of the dome is a little off center and just points one direction. So I made small cuts toward myself, also off to one side, and that gave me extra shadow. One millimeter of cut does it. Every cut makes a huge difference, and that's just my personal opinion, of course.
Here is where I let it be loose on this flower, where I didn't, and what I said about each.
| Spot | Choice | Reason |
|---|---|---|
| Five small petals | Not perfect, which is what I'm after | Too perfect looks artificial, not natural |
| The flower's eye | A little off center, pointing one direction | Every cut makes a huge difference |
| The outline itself | Stabbed this time, quicker, but not preferred | A stab spreads fibers both directions |
| Paper on top | Some left on, so I'm still level | Same level with the overall panel |
| Background beside it | Lowered just a little, not too deep | Too deep would be a big mistake |
| One petal edge | Edge not too clean, finished upside down | I want a 3D feel, curling |

How shallow is this low relief carving, in real life?
About a millimeter. Between the highest spot and the lowest on this section the difference runs a millimeter, maybe a thirty-second of an inch, which is far shallower than the camera makes it look. What you see on the camera is much bigger than in real life.
That's why I try to be as careful as I can. I do not want to damage it. This is really low relief, a really shallow carving, on a board only 10 mm (3/8 inch) thick, as I said in lesson 18.
Even the background I touched only a little. I don't want to excavate too deep there, because that loses overall depth, and that would be a big mistake. Where I wanted more shadow, I dug deeper inside, underneath the leaf, and kept the background where it was.

Why use a mallet on a half-millimeter veiner?
For control. With the mallet there's a lot more control, and I know I repeat myself when I say it. I undercut with the half-millimeter number 11, though a 1 mm one could work too.
Position the tool right at the edge, roll it leftward to about forty-five degrees or a shade lower, then make the first pass. Then the same on the other side, with the mallet where the grain runs across. Really easy, just a slight tapping, not hard at all.
Around one leaf I laid the veiner almost completely flat on one side, with only a slight opening. I could have pointed a gouge inward instead, but it's much harder, and even with help from the mallet that's usually not the safest way, because you can catch the edge and break a section of the carving. That is why I like the half-millimeter veiner here.

Three makers came out on the bench in this lesson. A number 3 at ten millimeters by Henry Taylor, a number 3 at three millimeters by Ashley Iles, and a number 1 chisel at a sixteenth of an inch by Dockyard. The Henry Taylor is a different brand, but still somewhat flat, and I used its corner without forcing it.

Why turn the gouge upside down on a petal?
To make an edge curl. I wanted a 3D feel, so it really looks like the petal is curling.
At one point the paper bugged me, so I placed my number 3, the 10 mm one, upside down and cleaned the paper out. Right away I could blend with it as well. Then I looked at a section I didn't like and decided to take a petal of this flower underneath it, curling it little by little all the way under.
My edge stayed rough at first. I was okay that my edge was not too clean, because I still had to work it with the tool upside down. When that was done, it felt like the petal curls from that point all the way underneath, and that's exactly what I wanted to see. Near the end I did it again on another section I wasn't too happy with, curled it down, and it was looking much better.

Corners want a small tool. In those tight corners a big tool can hardly get in at all, but a small one gets there easily and hooks the waste out.

What does paper left on top tell you?
That you are still level. Nice and sharp, with paper still on top. I still had some paper left on top after the veiner pass around one leaf, which meant I was still at the same level with the overall panel, and that is really good.
The paper left right at the ridge came off, though. Early in part three a number 3 cleaned it off, and then I took the corner of the same tool to dig deeper cuts in a few spots, because I wanted a good shadow.

How do you make a flower show on dark walnut?
With good shadows. On a darker background a flower is not always visible, and the way to make sure it is, is to create really good shadows.
Switching one of my two lamps off is how I check. With the lights from two sides you don't really see the true shadow that will happen in real life. Turn one off and the shadow is there.
Chiaroscuro, as Wikipedia explains it, is the word artists use for contrasts of light that give a sense of volume. This is the same idea I worked on in lesson 19, undercutting even tiny spots for extra shadow.
Stain, then antiquing. When the panel is done we are going to stain it and use an antiquing technique. All those shadows pop. It is going to be gorgeous.

Does not perfect mean you can be careless with the tools?
Careful still matters, because digging too deep can break the flower. When I brought one section underneath the flower with a number 3 upside down at about 45 degrees, I had to feel it. If I dig too deep right away, I can catch the edge of the flower. It's not impossible to fix, but I'd rather not spend time fixing it and get it done right from the first try.
I also didn't want to see a channel between one leaf and the next. I wanted the whole section to feel like it goes underneath the flower. Little by little. Cut by cut. When the wood there would not come out, I did not force it, and I took my number 11 at half a millimeter to that spot instead.
Even a quick undercut with the number 3 felt too dangerous on one petal of the previous flower, because I can always catch it and break it. Soon after, I reached for a smaller tool, the Dockyard number 1, which is 1/16 inch, about 1.5 mm. Just patience, patience, and patience.

Late in the lesson I said I'm not too happy with this flower yet, because I left too much ridge. But it's easy to fix, and it doesn't take long at all.
Can one spot belong to two things?
You choose, and either choice can be right. One piece of this corner could read as part of the big flower or as a continuation of the straight molding running beside it, and both readings are legitimate ornament. I stayed with the original drawing and made it part of the flower. Then the leaf beside it goes underneath.

Did I say the same thing about other flowers I carved?
More than once, and on very different carvings.
On the Venetian Flowers Rosette, lesson 2, working around the high spot of one flower, I said it doesn't need to be perfect. Matter of fact, if you do it too perfect, it won't look natural.
In Carving Hashemi Flowers 30 I was making a flower look more or less finished, using number 5 and number 9 gouges. I told you to try not to make it perfect and to give it some waviness, because in nature you're not going to see a perfect round.

On this same panel, working on the bouquet in lesson 23, I gave the inner part some waviness and a really nice concave, since otherwise it doesn't look organic. That organic look is what we are after.
And later, in Carving Furniture Panel 31, carving the berries on this panel, I said they don't have to be exactly the same size. All of those could be slight but different.

Would you like your next carved flower to look natural? And on dark wood too? Then let its petals differ a little, and put your care into clean carving and deep shadow.
The full carving stage is on the Part 2 page, and the drawing behind it is in Design Part 1. You can print the pattern from the pattern download page. To carve this panel with me, the Access plan is here.
How it's done
- Outline the little flower first. Go around it with a narrow number 11, then carve with a different tool underneath, so the ridge stays a bit higher. A stab with a gouge works if you are in a hurry.
- Dig a deep line for shadow. Take the 4 mm number 7 down a millimeter and a half or so, slicing with a slight turn instead of pushing.
- Raise the middle as a low dome. Same gouge. Go slowly toward the middle along the grain, or it snaps out.
- Separate the five petals, unevenly. Push a 0.5 mm veiner toward the middle for a micro separation, and leave the petals not too perfect, or the flower looks artificial.
- Set the eye slightly to one side. With a 1 mm number 8, make small cuts toward yourself, a bit to one side, for extra shadow.
- Undercut with light mallet taps. Put a half-millimeter number 11 at the edge, turn it left to about 45 degrees or lower, and tap lightly where the grain runs across. Then switch one light off and look at the shadow.
Frequently asked questions
How big are the filler flowers on the furniture panel?
About 10 millimeters, or three-eighths of an inch, across. I raised the middle of one as a small dome with the same gouge I had used around it. Carving toward that center with the grain needs care, since pushing too hard can snap the middle part out.
Is a stabbing cut wrong for a small flower?
Wrong is too strong a word. I showed one: a number 5, 3 mm wide, set straight down and walked around the outline, and I called it acceptable when you want to work quicker. Outlining first is my preference, because stabbing stresses the wood.
What depth is the relief around these small flowers?
Around a millimeter between the highest spot and the low spot, I would say, maybe 1/32 of an inch, in the section I showed in part four. Earlier, around the first flower, a 4 mm number 7 went about 1/16 inch deep for shadow. The video makes all of it look bigger.
What to carve next