

Alexander Grabovetskiy, woodcarver, School of Woodcarving · Published 2020
What is a filler flower in wood carving?
Quick answer: A filler flower is a small, easy flower that wood carvers add to a design to fill an empty spot, and that is how it got its name. On my walnut furniture panel I carved one with a number 7 gouge, 4 mm wide, and showed two ways to do its middle, popped out or raised up as a dome.
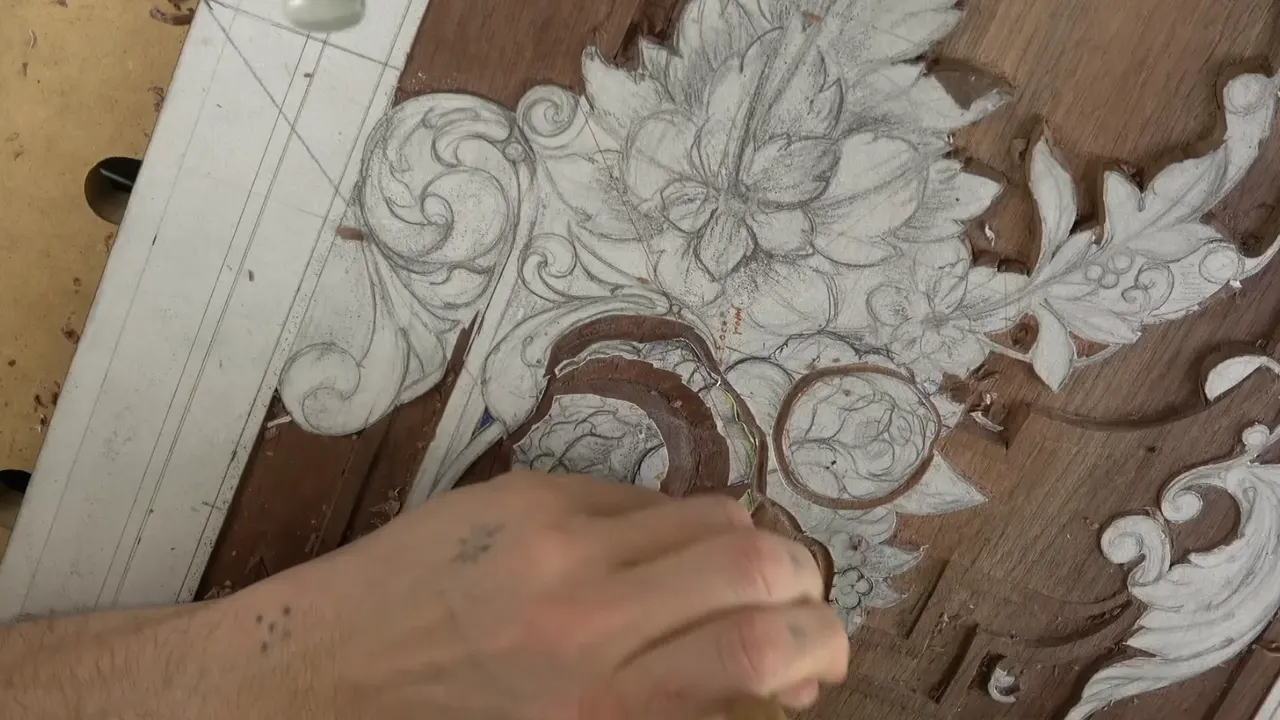
A filler flower is a small, easy flower that wood carvers put into a design to fill the space. The name comes straight from the job. In lesson 23 of this walnut panel I stopped in the middle of the main bouquet and carved just one, because I think it is a really nice flower to show you. There is more than one way to carve it, and I showed two.
Can you hold a small gouge in your fingers? And could you turn it a few times in one spot? Then you have most of it.
The second way builds a dome from the middle, and I think it gives more. Most of this lesson went to the big flowers of the bouquet, and the small gouges come back there, so they are here too.

Lesson 23 point by point
- Two ways to do the middle.
- A little hollow beside the dome tells you which way the flower faces.
- You can pop the middle out, or leave it standing up round.
- Under a big flower's petal, a half millimeter veiner throws a deeper shadow, and a mallet gave me more control with it.
- When a flower rolls, its low side drops 1/16 in at most.
- Facets are okay, sharp ones are not.

Why do wood carvers call them filler flowers?
Wood carvers named them for the job they do, as I said in this lesson while I carved one. They fill the space. Almost the same words came out of me in the dining table apron course, while carving filler flowers on that piece.
There I said they are really easy to do and they look really nice, and you can use them everywhere. I also said Grinling Gibbons used that type of flower a lot. The apron ones were really simple, flat ones, with nothing going toward the center the way it did on the bigger flowers of that apron.
You could carve them like the bigger ones, I said, with the center higher and your gouge going in. But the original carver didn't, so we couldn't either. In my opinion it would look nicer. Still, I guess I can't argue with the original guy.

This panel has no original to follow. The design is my own, and I drew the fillers into it back in Designing Furniture Panel 12 and Designing Furniture Panel 14. This time I raised the middle.
How do you carve a filler flower with one small gouge?
Mine took a number 7, 4 mm across, for almost all of it. Not quite 3/16 of an inch, a little smaller. But if you have a 3/16, it is going to do exactly the same.
First I took the wood away on the outside, so you could see the flower. Then the middle. Here you get to choose.

Way number one is to set a small gouge right in the middle, rotate it a few times, and pop that middle part out. It creates a beautiful movement.
But I think a dome is going to create a lot more. Using that same tool I made a rotation movement around the middle, and then I started moving toward that line from outside in. Maybe that tool was a little too big. That's okay.
Go in, but be careful not to dig too deep. I could only bring the camera so close that day, and I am sorry if my hands covered the work, but you will see the result.

Which middle should a small flower get?
Either one works, and how deep you go is all up to you. You can go really deep if you wish. I have done really deep flowers like that, and they look gorgeous, actually.
| Middle | Gouge | Effect |
|---|---|---|
| Popped out middle | Small gouge set in the middle, rotated a few times, middle lifted out | A beautiful movement, I said |
| Raised dome | That same gouge circling the middle, working in from the outside, then a number 8 over it | I think it creates a lot more |
| Dome plus a spot | Excavation on just one side, made by a tiny number 8 | Tells which way it faces |
| Very deep version | Same idea taken much deeper into the wood | I have carved those, and they look gorgeous |
On this one I raised the middle and shaped the dome without changing tools. I wanted it to look rounded from all of the points of view. Then I stopped going deeper and took a smaller gouge, a number 8, to go over it again.

What does a tiny hollow beside the dome do?
A small spot carved on one side tells the eye where that flower is pointing. I could have left the dome just like it looked. There is another technique, though, which I think is a really cool technique, and all it takes is a smaller gouge, a number 8 at one millimeter.
I made that small spot, and then I asked you to look at what I just did. It's a small detail, but it's a really nice detail. It gives me extra movement, I would say.
Around that little flower I still have to excavate and lower the wood down. We left that for the next time.

What did the big flowers of the bouquet need first?
A big gouge, to clear the wood fast. Around one of the big flowers I used a number 6, one inch wide, 25 mm. It is just much quicker.
You don't have to buy one. With small tools you get exactly the same result, so don't panic. If you buy it, it's only a plus. A bigger tool you can use as a small tool, and I just love a big tool sometimes for the speed.

I wanted to exaggerate one flower, since it is the central focal point, the main point, and I still had material there to go a little deeper. Next a number 11, 3 mm (1/8 in), outlined around the outside. Maybe I got too deep on an inner line, but it was okay, and I made it part of the composition.
An acanthus movement goes right on top of that flower, and the flower goes underneath. That detail I didn't want to lose. And yes, I was working against the grain there, which is not the best way. Turning the other way would have been much smarter.

The second flower got a flat number 2, 12 mm, about half an inch. I sliced carefully with it to chamfer it. Then, with the tool turned upside down, the outside petals started to feel like they grow from underneath.

Can a shallow flower cast a deep shadow?
With an undercut, it can. Step one on those flowers was a small undercut on the inside, made by a 1 mm number 11. I went right underneath, not much, but a little bit, just to give that extra shadow.
After that a number 5 dug in with just one side of the tool, a little bit inward. The number 4 works the same way. That leaves a really crisp outline, and if I need help, I use the mallet.
We don't have deep excavation on this board, but it feels like it's really deep. I'm after exactly that shadow. How I undercut the rest of this panel is in lesson 19.

A little later I said a half millimeter number 11 would be wiser than the 1 mm. It goes much deeper. You get a much more three dimensional feel and deeper shadow casting. Near the end of the lesson I showed it again on another flower, and that tiny veiner made the shadow a lot more pronounced.
Careful with it. I got kind of deep on the inside, which is a good thing, but I didn't want to break my tool. So I took a mallet. Much more control, a beautiful, clean cut, and the shadow just casts beautifully.

One time I got too deep with the undercutting, right on camera, and created an extra movement. Absolutely okay. Extra movements are the next step for those flowers anyway, since otherwise they look too dull. They don't look too appealing.

What gives a carved flower its curly look?
Concaves inside the petals. On one main flower I gave real nice concaves and convexes with different number 8s and number 11s, and everything is supposed to go to the center point. Otherwise it is not going to look too nice.
Now I don't want to rush anything. Now it's all about the details, and you can do really beautiful details or really bad details. It's all about how you take your time.

One concave going inward makes the petal feel like it curls in that direction. Just a trick for the eye. After that I blend with a smaller number 3, 1/8 in, because I don't want to see sharp ridges.
Bigger concaves gave me more waviness. On another flower I took a number 8, 7 mm (just over 1/4 in), and yes, I know it's kind of a big concave, but it gave me a really interesting move. Those concaves give a curly look, a really curly look.

In one spot I gave a backward cut, like a letter S, using a number 5 at 3 mm, one eighth of an inch. Facets on the petals can stay. Facets are okay, but not really sharp ones on the flowers, so I knock the sharp ones down with a number 1 or a number 3.

What we're trying to do is trick the human eye and give extra dimension to the place where we don't have dimension at all.

How far should a petal roll on a 10 mm panel?
About a millimeter and a half at most, and maybe just one. The whole board is only 10 mm (3/8 in) thick, as I said in lesson 18. The ground depths were set back in lesson 17 and before, and the deepest spots I have are five or six millimeters. I already forgot, because I started this panel a long time ago.
One flower was a little bigger than the other side, so I wanted it to roll a little. One side rolls one way, the opposite side rolls the other way, and that gives some roundness. Hope it makes sense.

A number 8, 7 mm, started the roll, but any small gouge will work. Call it filleting or chamfering, whatever you want to call it. We're talking, people, about no more than 1/16 of an inch, like a millimeter and a half, maybe even less, maybe just 1 mm down.
Next, a number 11 at 1.5 mm went in deeper, and a number 1 sliced the shape round. A knife will work the same way. Just make sure you slice it. Almost like a sphere, but not really, because we're talking about only one millimeter deep, maybe one and a half at the most. I didn't remember where my outline was, but I can always fix it. It's no problem.

Is the sticking-out leaf carved the same way?
Close to it, with divisions and relief cuts added. A plain leaf was not enough. It got three main divisions.
My middle line came first, and it made one division a lot smaller and the other a little bigger. A couple of relief cuts went into those triangles next, by that number 11 at 3 mm. Those relief cuts, they do matter. They're really important.

There are multiple ways to attack that piece, but I really don't need to overcomplicate stuff. A number 3 gave a preliminary concave right on the side of the middle line. In the right light it casts a little shadow, though on camera it is almost impossible to see.
Careful there, because the background has to stay flat. The movement got a letter S curve, which is how it's called, and then I was not too happy, because it looked a little too dull. I said I could use the Dockyard micro tools for a few concaves there. The point is just to exaggerate a little and create some interest.
A bigger number 11, 5 mm, leaned a little to the right, gave a little more dimension. The half millimeter would bring even more shadow there, but it was too early yet.
Why does a half-carved flower look rough up close?
When you look close, it doesn't look as nice. From a little farther, it looks really beautiful, actually, and in the overall design it's going to make a lot more sense.
On a darker wood like this walnut, it is sometimes hard to see before it's finished, and it's really hard to understand what is going on. I don't worry about what is going on inside. I can always just go back and clean it with the number 11, and it will look good.

One part had to feel like it was wrapping around another. Once you carve it, you will know exactly what I mean by wrapping around. I excavated with a 3 mm number 11, undercut with a 1.5 mm, went on with the 1 mm and then the half millimeter.
Right there I made a mistake, on camera. It was okay, I said, and really easy to fix.
For the last flower of the lesson I planned three divisions toward the center and decided which line goes above which petal. Where part of the middle grows from underneath, I turned my tool to the right. The middle I call my barrel. It got a bevel in the opposite direction.
Yes, I know it doesn't look finished, because it's not finished, of course. But in overall, it looks really awesome. Curly and nice. The bouquet goes on in lesson 24.

Who carved low relief with me in Tampa?
A great group of people at the Florida School of Woodwork in Tampa. I had just come from there when I filmed this part. At first I called them a beautiful group, and then I said I shouldn't say beautiful, don't get me wrong, a great group of people. We had some furniture makers, really knowledgeable people who do know what they do.
We did low relief carving for furniture there. It wasn't complicated at all, a lot simpler than what we work on here. I showed you that piece on camera. Same idea, about one sixteenth of an inch deep. The only difference is that the background is not removed the same way as on this panel.
We didn't get it done. But I think it's a really nice project to work on, something like that.

This panel takes me longer, and it's not because of the design. It takes longer because of my schedule. I still do carving for a living, and the main chunk of my day goes to carving for my customers, for my clients.
See the little round flower in the first picture? And the big ones around it? The small one took just a few small gouges, and the corner flowers before this lesson are in lesson 20.
The drawing of this panel is in Design Part 1 and the carving is in Part 2. Every part of this lesson is waiting in the school.
How it's done
- Take the outside down first. Remove the wood around the flower first, so you can see its shape. I used a number 7.
- Choose the middle. Pop the middle out by setting a small gouge in it and rotating it a few times, or keep the middle and work toward it from the outer edge to raise a dome.
- Watch the depth. Go in, but be careful not to dig too deep. How deep is up to you.
- Round the dome. Shape it until it looks rounded from every point of view, then go over it with a smaller number 8 gouge.
- Point the flower. Excavate one small place on one side, using a number 8 that is one millimeter wide. That small detail shows which way it points.
- Lower the ground around it. Later, excavate and lower the wood all around the little flower. I saved that for next time.
Frequently asked questions
What size gouge carves a filler flower?
Mine was a 4 mm number 7, a hair under 3/16 in, and a 3/16 does the same job. A smaller number 8 went over the dome after that, and then a one millimeter number 8 made the side spot.
Is a one inch gouge required for this panel?
Big tools are handy, since a bigger tool can work as a small tool, and my one inch number 6 cleared the wood around a big flower much quicker. Small gouges get you to the same result. Buying a big one is only a plus, so please don't panic about it.
How deep can a filler flower go?
As deep as you like, and I have carved really deep ones that look gorgeous. On this walnut board the deepest spots are only five or six millimeters, and I said not to go deeper than the deepest spots you already have.
What to carve next