

Alexander Grabovetskiy, woodcarver, School of Woodcarving · Published 2019
How do you carve tiny acanthus movements on a furniture panel?
Quick answer: Acanthus carving at this size is work in very little wood. On my walnut panel the ground went down 1/8 inch (3 mm), and the smallest parts came out about one millimeter wide, one to one and a half millimeters above it. I pick the high side first, cut concaves to raise the pipe, and undercut only for a shadow.
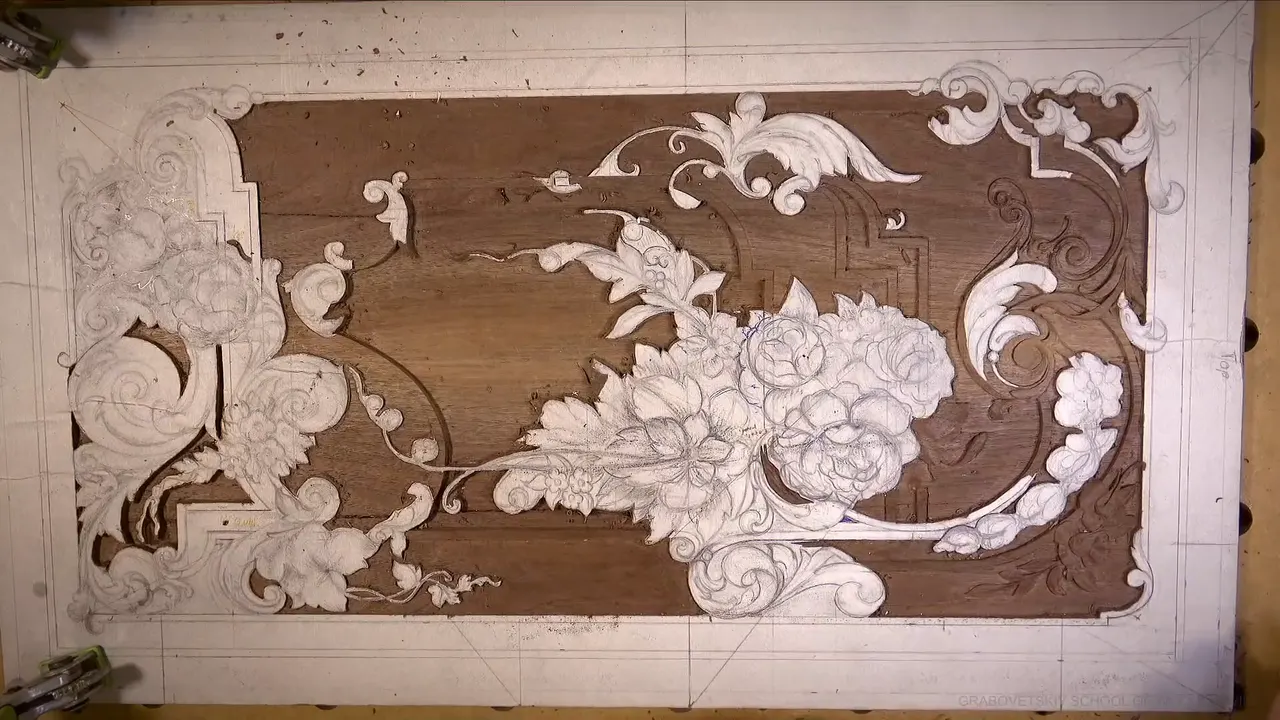
An acanthus movement on this furniture panel is carved in very little wood. The ground goes down only 3 mm, an eighth of an inch, and the smallest parts end up about one millimeter (0.04 in) wide. This is lesson 21 of my Carving Furniture Panel course, the upper part of the board, and it is acanthus carving at the size of jewelry work. The board is the walnut one from my design course, only 10 millimeters (3/8 in) thick.
Have you seen leaves like these on old furniture and wondered how anyone carves them that small? Would you like to try one without snapping a piece off? Then watch where the wood stays high and where it goes down, because that decision comes before the tool goes in.
Wikipedia calls the acanthus one of the most common plant forms used for foliage ornament in the tradition that comes from Greece and Rome.
Lesson 21 in six short lines
- The ground here sits 3 mm down, and my straight down walls stop just above it.
- Before a separation cut, I decide which side stays higher.
- A pipe is a raised ridge, and concave cuts beside it bring it up.
- Many parts come from underneath, which gives a beautiful shadow.
- Undercut for the shadow, but keep it solid, because it's a furniture panel.
- When a tiny piece broke, I glued it back with a toothpick and carved somewhere else to let it dry.
How deep does the ground go around acanthus this small?
One eighth of an inch, 3 millimeters, is the depth I took the background to. I outlined with a number 11 veiner, the 3 mm one, and came at each spot from opposite sides until the two passes met. Next I found the closest matching gouge and hit straight down to make a wall.

Please don't hit really heavy. I said that many times, because a wall that reaches the bottom leaves a tool mark on the background, and we undercut later. One wall I stopped about 1/64 of an inch (0.4 mm) short of the background. If a mark on the bottom is okay with you, I guess it's okay. Lots of carvers just hit it hard and forget it, which saves time, and some of you are really looking for those marks.
Here is a small sign I watch for. While I cleaned one spot with a grounding tool, the waste was not flying out, and in this case that's a really good thing. It means my straight down cut stopped short of the final depth, so I still have space for cleaning.

What is a grounding tool, and do you need one?
My grounding tool is just a number 3 in the London pattern, about the same sweep as a number 2 in the Swiss made pattern. It's almost flat. But it still has a slight curvature, and that's what I like, because it gets into tiny spots. I used two widths here. One was 3 millimeters wide, and the other a sixteenth of an inch, a little over 1.5 millimeters.
Ask me if you need one, and I'd say it all depends on how much background you remove on a regular basis. If it's not much, a straight number 3 or number 2 will get you by, depending on the pattern. During the fourth video, a router plane brought one molding to the same height as the other side. Wikipedia says that tool planes the bottoms of recesses to a uniform depth.

Which side of an acanthus separation stays higher?
You decide that before the separation cut. In the second video, logically, one side of a movement had to be higher than the other. One spot would stay somewhat flat, and another would get rounding from both sides. I carved on one side so the other part could grow from underneath, and I know that can be a little confusing at the beginning.
On that movement I started with the eye. It's not a big eye, but still, it's an eye, an eye of acanthus. I explain eyes and pipes, the anatomy of the leaf, in my acanthus lessons, and lesson 4 of my Greek acanthus course carves both. One section of my drawing had an eye and a pipe, and I removed them, because I didn't think they would look good. That movement then came from underneath the main movement instead, and I think it makes more sense.

How does a concave cut bring up the pipe?
A concave goes in on one side of the ridge, then another on the other side, and the pipe stays up between them. Many times, carvers in the past would leave a shape like this as it was, because it looks almost finished, I said. Not for me. I really like to see concaves.
In those separations, logically, you're supposed to have a pipe, a raised ridge, and to create that raised ridge I have to create the concave cuts. I took a micro tool, maybe a number 8 at 3 mm, and started with barely any material, going a little deeper on the way. It gave me that beautiful pipe look.

The other side needed a bigger tool, a number 7, maybe 4 mm (5/32 in). I could carry that concave all the way, but I don't have to. A little blending into the flat was enough, and the edge kept its taper, still high enough.
Why does so much of this corner grow from underneath?
A part that comes from underneath casts a really, really beautiful shadow, and this corner has several of them. One line belonged to another detail, and the part beside it had to go all the way down under it. I know it doesn't make sense right away, but it creates a beautiful movement.
My first pass there was with a 1 mm number 11, and then I lowered the part with a knife, using its heel for one straight cut. Almost no pressure. A lot of pressure right then would have been a big mistake. Another movement goes downhill, changes direction and, once the blend was right, goes in, in, in, turns, and slips underneath.

In the twelfth video I kept the parts beside a flower low, maybe one millimeter above the background, because I want that flower popping as the hero of that region. On the small flower in the ninth and tenth videos, the petals rise from below, go uphill, then downhill, with a little bump, like a mountain almost. Small flower, but important.
How far can an undercut go on a furniture panel?
Deep enough for a shadow, but there's a limit. You really don't want to make it too weak, because it's a furniture panel, and as I said, you always have to consider how it's going to be. Under one flip I went deep, deep, deep with a half millimeter (0.02 in) veiner. That's called extreme undercutting, so be careful.

Carving right through is possible, but in furniture carving that would not be too practical here. Some spots, maybe. Under the tiny parts in the last video there wasn't much material, so I undercut just slightly and kept them solid. One undercut was only 1/32 of an inch (0.8 mm) deep, almost a jewelry cut, made by a double bevel number one, 1/16 inch wide, pointing inside.

Which tools carved a detail one millimeter wide?
Mostly very small ones. My number 11 veiners, at 3 mm, 1 mm and half a millimeter, show up in every video of this lesson.
| Tool and size | What it did on this corner of the panel | Which video |
|---|---|---|
| Dockyard number 8, 1/8 in | A concave that runs downhill and then comes back up | First video |
| Ashley Iles number 3, 3 mm | Gave a movement a slight rounding, then blended it | Second video |
| Wide number 7, 20 mm | One big pass that left a nice, finished wall inside | Fifth video |
| Big number 7, inch and a half | Fit a curve perfectly and gave me a nice flow line | Seventh video |
| Mallet and number 5, 20 mm | Shaped the small swirls, which kept getting more fragile | Twelfth video |
| Number 23, 6 mm | Fixed the overall curve of a movement I did not like | Thirteenth video |
The number 3 in the second video is from Ashley Iles, the Peter Benson collection. The back bent is stamped 25/2, a number 5 sweep at 2 mm, a little bigger than a sixteenth of an inch.

When should you reach for a big gouge on a tiny curve?
Whenever its sweep fits the line, because a bigger tool is much quicker. It's not always possible. But if it is, it's always better.
For one curve I tried a number 7 that is huge, an inch and a half (38 mm), and it fit perfectly and gave me a really nice flow line. I used it on the outside too, just a little, so I wouldn't lose the detail I carved before. A 20 mm (3/4 in) number 7 made one big pass that left a nice, finished wall inside.

Before a matching gouge goes straight in, I make a preliminary relief cut, here with a 3 mm number 11, just taking some material out. Without that relief, the metal is thick and pushes the fibers both directions. The wall looks clean at first, but the next morning that side is somewhat rugged. It's doable, but it's not my preference. With the relief done first, my one inch number 8 (25 mm) gave a beautiful curve without any waviness, and it pressed no fibers in.

What happened when a tiny piece broke off?
I glued it back with a toothpick, and after one more bump I worked somewhere else to let it dry. I was undercutting the small flower, and what happened right then is what should not happen. My glue was a Gorilla glue, the kind that is like super glue, and it just dries really quickly, so for small details like that it's excellent.
Wikipedia notes that cyanoacrylate glues, a family of strong, fast acting adhesives, are sometimes called super glue. I put a little under the piece and pushed it back, so it fell right in the same spot.

Next I hit the very spot I had just glued. So I switched to another part, and when I came back later, it was still not dry. I don't want to see that happen, but sometimes it just happens, and I'm not the only one who has to deal with that stuff.
How can you control a tool on something this tiny?
With very little pressure and the whole body behind the tool. I'm not moving the tool, I'm actually moving my whole body with it, and I mean my own body. On a detail I wanted only a millimeter wide, I made a chamfer first, and it helped me get really close and keep the part solid. A video later I used a stepping cut with a 1/16 inch (1.5 mm) number one, starting on one corner of the tool, then a step, corner and step.

In one dangerous area I wiggled the tool a little, because I didn't want to push it too hard. Not all carvers approve of wiggling, but it works. A jewelry maker who worked with gold and silver taught me that move on metal. I liked the idea, tried it on wood, and it works exactly the same.

Whenever I see a triangle, I attack it from the point side, even if I have to break the rule of the grain. For me, at least, it's much safer, and I get a much nicer curvature. We have a saying in Russian folklore, "If you rush it, you're going to make people laugh."
What went wrong on camera, and how did I fix it?
On one volute I made a preliminary cut before I decided how it would slope, and that was my mistake. Later I could still see the tool mark from it, so I attacked it with a small concave inside, an extra level of shadow. As you know, I'm all about shadows and lights, and there are five different levels of shadows you could create.
As I carved, the old mark was disappearing, and that made me happy. Nobody's going to know, besides me, that it was a mistake. Oh, and you, of course.

That volute had a design problem too. It came out about the same size as the one before it, and a detail should repeat itself, but it cannot be the same size. And that's not good, I said. My idea was to make one of them smaller, with a secondary slope.
Later I saw a tool mark right on my background, the very thing I said many times I didn't want to see. Somehow I created it for myself, and there is a way to hide that.
Where does lesson 21 sit in the course?
Lessons 16, 17, 18 and 19 are each titled working on background, and lesson 20 is the flowers in the upper right corner. Lesson 22 carries the same title as this one, upper part, acanthus movements.
The drawing came first, in fourteen lessons of the furniture panel design course, and at the end of design lesson 14 I said I believed I was ready to carve it. It did change a little from the original, but it's okay with me, because on the go I usually change some stuff. This style, I said, is more North European, more French late 18th century, and there are a lot of other styles for furniture panels.
Just before this lesson I came back from Tampa, Florida, where I was teaching a class in person. I think I love it even more now than I used to, and in person you experience a different side of me. I want to take details like these to perfection.
Do you have one small corner of a board you could carve? Would you like to watch me carve this one, all fourteen videos? If you want someone beside you while you carve, that is what the school is for.
How it's done
- Take the ground down to 1/8 inch. Outline with a fine veiner from both sides, then lower the background to about 3 mm. Stop each straight down wall a little above it, so no tool mark lands on the floor.
- Pick the higher side first. Before the separation, choose which side stays up. The lower part will then look as if it grows from underneath.
- Carve the concaves that raise the pipe. Begin from almost nothing with a small number 8 and go a little deeper as you travel. Repeat on the far side with whatever sweep fits, then blend the concave into the flat.
- Relieve the line before a big gouge goes in. A number 11 veiner, 3 mm wide, takes some wood out around the line first, so the gouge does not press the fibers.
- Undercut just for the shadow. Use a half millimeter veiner and keep each part solid, because this is a furniture panel.
- Glue a broken piece, then work elsewhere. Put a little fast glue on a toothpick, push the piece back into its spot, and carve another area while it dries.
Frequently asked questions
How thin is the smallest part of this acanthus?
About a millimeter across, and one part of a small flower ended up a little under that. The small swirls stand roughly one to one and a half millimeters above a floor 3 mm (1/8 in) down. In one place I left a wall of only one millimeter to undercut later.
What glue holds a broken piece of carving?
On this panel I used a Gorilla glue that works like super glue, because it dries really quickly. A little goes under the piece on a toothpick, and then you push it back home. Any shine can be cleaned off later.
Why use a magnifier lamp for detail this small?
To see much better, because once the work turns to fine detail, it's kind of hard to see for me. Even with a lot of lights on my bench, I felt I needed to see a little better, so the lamp came back again and again in this lesson. Sorry about its squeaking noise on the video.
What to carve next